
Perfect Grade Unicorn Gundam

Bandai’s Perfect Grade Unicorn Gundam is essentially two things to me: It’s literally the greatest model kit I’ve ever built in my life, and it’s single-handedly the reason why this blog exists. This build was so involved and it took me such a long time that I felt like I had to talk about it. I thought about doing this as a Youtube video, but at the end of the day, I’m just more comfortable writing about this stuff.
So welcome to RoboShop, my newly-created blog for Zoids and Gunpla. We’ll see how long this one lasts. I originally posted this review on my opinion blog PVNBC, but now I’ve got so many ideas for other kits I want to talk about that I went ahead and started this new site even though I only have one entry. Expect more soon – I already have a review of the RG Sinanju all written up and ready to go, but I might actually do a Zoids kit first.
But now let’s take a look at the PG Unicorn because man, there’s a lot to talk about here.

First off, accessories! As you probably know if you googled “PG Unicorn Gundam” long enough to find this blog somewhere on page 50 of your search results, this version of the Unicorn has two of those nifty vulcans in addition to the beam magnum, bazooka and shield that you’d expect. Important note: I love vulcans. I really do.
As you can see, I decided to paint the various guns white and blue (in addition to Tamiya’s chrome silver and gunmetal, that is) to match the colors of the suit itself. I’ve never liked the monochromatic look of the weapons on just about every Gundam kit out there and decided to go all out this time.
With hindsight, the white is probably a bit much, though it looks better as soon as you see the suit holding the guns because it makes sense in context, so to speak. You might also spot the unicorn logo on the beam magnum’s scope and the shield – I had these left over from the sticker sheet that came with the action base for the MG Unicorn, so I decided to use them here.
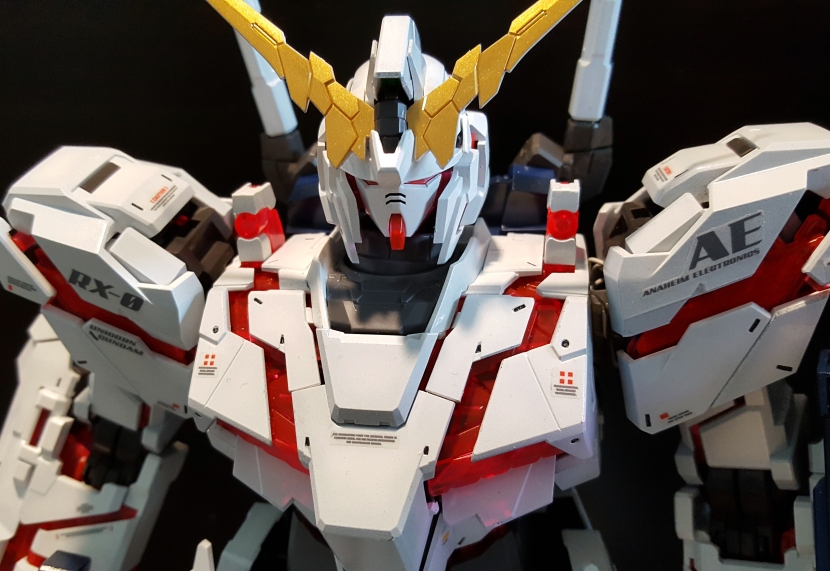
I also painted all of the scopes red. Somewhat disappointingly, these all come molded in straight clear plastic with foil stickers, which frankly I think is ridiculous for a PG kit. Not a difficult fix, though – I just painted them red on the inside, which gives them the appearance of clear red as soon as they’re attached to the guns.
On the suit itself, I decided to pre-shade all of the white armor. Sadly, the photos barely show this, other than the mismatched shades of off-white on some of the armor pieces (which you will now not be able to un-see because I told you they’re there.) It looks better in real life, but with hindsight, it really wasn’t the smartest idea to choose the PG Unicorn as only the second kit in my life where I did pre-shading. There are something in the general vicinity of 130 white pieces on this kit, and getting them to match was basically impossible, at least with my limited skill set. I really tried to be careful, but I still ended up with about three different shades of off-whte that are randomly scattered all over the kit. I’m going to keep pre-shading stuff, but the next kit I try this on is going to be something, um, simpler. I also wonder if it’s generally difficult to do this with white or if I just shouldn’t have used black for the pre-shading – the blue pieces on the feet, backpack and the guns are pre-shaded too and came out looking much better because of the way the black blended with the dark blue.
Overall, I’m glad that I painted the kit and it’s still an improvement over the unpainted look despite the numerous flaws and imperfections, but if you’re thinking about buying this thing, the plastic actually has a very nice matte finish to it and you’ll probably get a good result without that toy-like sheen to it even without so much as clear-coating it.
 Here’s a shot with the shield and the beam magnum. I really think unicorn mode is kind of underrated, I like it a lot. Actually the reason I built an MG Unicorn before this one was so that I could display that one in unicorn mode and this one in destroy mode. Turned out to be a good idea anyway because building the MG teaches you a lot of stuff that comes in handy when you build the (vastly superior) PG. I would actually recommend that you do this if you have your sights set on the PG kit, I really thought it helped.
 Bazooka! Yeah, it’s big, and contrary to popular belief among people who don’t attach the shoulders correctly, the suit can hold it up just fine. You may have already noticed on the first pic that I did by far the most detailing on the bazooka. I did similar things on the MG version already because I really don’t understand why this thing has all this detail molded into it and then it’s all just a solid chunk of dark grey.
 Poseability, as you can see, is excellent. The knees actually bend almost 180 degrees with the LED wiring inside them. I kind of wish the ankle was more flexible so you could do this pose with the foot planted, but it’s still pretty impressive, and given the MG’s weak ankle joints, it’s probably a good thing Bandai emphasized stability over flexibility. Here’s two more shots of this pose.


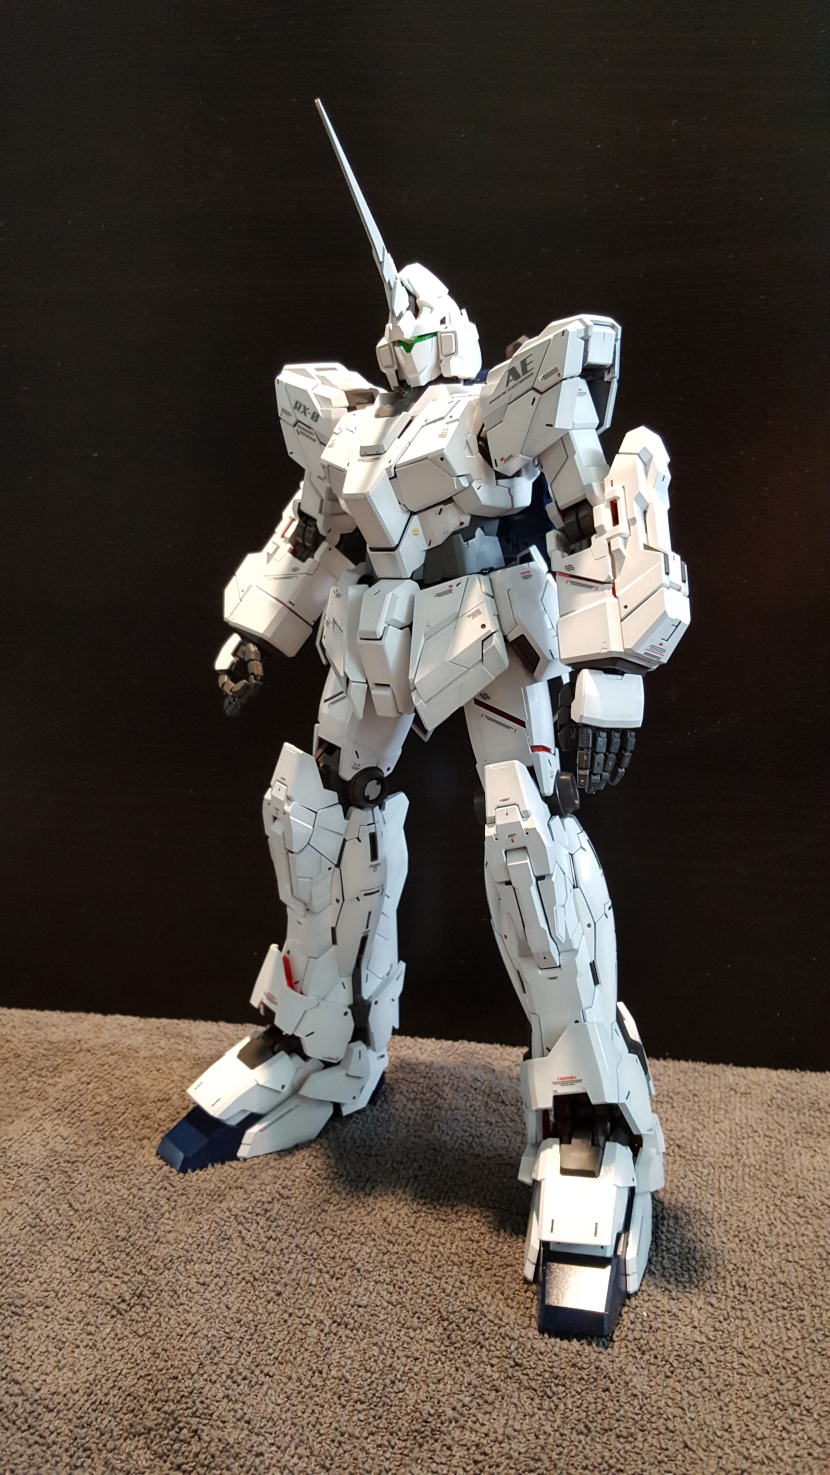
And now what everyone really wants to see: destroy mode!
 I decided to spray-paint the lid for the battery case red, as you can see, and added a few stickers from that other action base. Those white marks under the suit’s left foot are scratches from when the legs fell off with the feet not attached to them. No idea how that’s physically possible, but they’re there now. I may go back and repaint the entire base because it has kind of a shitty plastic sheen to it anyway, but if I do that, I’ll never be able to stash the accessories in their slots again.
 Did I mention how fantastically poseable this thing is? The arm actually bends back far enough for you to pose him drawing a beam saber from his backpack. The only problem is that you can see the wiring in the armpit.


Here’s two pics with the beam saber out. I couldn’t make up my mind which angle I liked better. Hey look, I took over 100 pictures for this blog, so this is already me with maximum restraint here.
 The beam magnum, of course, comes with a handle on the side that allows the suit to two-hand it like so. And here’s some more beam magnum pics.


One thing I really wanted to try was this pose with the two vulcans. I’m happy to report that it worked just fine. I did have some problems with the left arm popping off at the rotating joint under the shoulder; I think that may have something to do with the wiring not being placed correctly. At one point I tucked the wires back in there and reattached it, and it’s been nice and firm ever since.

 If you’re building this thing with the LEDs (and you really should, it’s totally worth it), I’d have to say be very careful to put the wiring in place correctly in the arms; once they’re attached, they’re never coming back off because of the way the wires tuck into the sides of the body. This is an infamously difficult step of the building process, and it’s pretty much irreversible. Once they’re in there, they’re in there. You’d have to take the entire torso apart to change anything. So make sure you get that right. And it does work, by the way – I’ve seen some reviews where people complained that you can’t get the wires in there the way the instructions show, but you absolutely can, you just have to get it exactly right, and I’m guessing the Japanese text in the instructions would help.
 The accessories, of course, all have slots for them on the display base. If you’re going to paint them, though, I don’t know if I’d recommend doing this. I managed to scratch the back of the bazooka the first time I put it in its slot. This is also why I’m reluctant to paint the rest of the base even though it doesn’t look very good in its current state.
Another complaint I have about the display base is that as huge as it is, it’s still not big enough. It’s pretty much impossible to get the suit airborne in destroy mode. You can get the feet maybe half a centimeter off the ground and do a few things with the legs, but it’s really kind of a shame, given how poseable the kit is, that the base isn’t constructed to really let you get the most out of it.


The vulcans can be attached to the arms with the shield on top of them, as seen on the full armor versions of the Unicorn. This looks frickin’ awesome, and it’s the way I have it displayed. It’s kind of a pain to do, though, because you have to take apart the hinge that holds the shield the regular way and put the pieces back together on the vulcans. Plus you’ll probably end up scratching the paintjob on the vulcans. Sigh.
 Here’s my attempt at a picture with everything lit up. You’ve seen other pictures and videos, I’m sure, and let me just tell you the same thing everyone else says – it just doesn’t photograph well. It looks positively amazing in real life and I promise you the first time you light it up you’ll get all giddy. I plugged the torso in and lit it up before I’d even built anything else, and just doing that made me so excited that I couldn’t stop working on the kit for about 8 hours straight afterwards. It’s that cool.
 And then of course there’s unchained mode. I didn’t quite get what I was going for with this pose, in part because I think it would have looked better if I’d been able to get the suit off the ground, but it really is damned cool, especially those opening panels on the legs. Here’s some more pics, including one with the LEDs lit up.


And that’s all the pics I’ve got, folks.
As I said further up, this kit took me almost three weeks to complete, but that’s mostly because of all the painting I did. If you forego that and just do some panel lining and the stickers, I’m sure you can build it in a weekend. Apart from some of the wiring you have to do for the LEDs, it’s actually not that difficult to put together, it’s just a lot of parts. I really thought it was a lot of fun. The legs in particular are an absolute engineering marvel in the way everything snaps and clicks together and how well the transformation works once they’re complete.
You’ll appreciate this and many other aspects of this kit even more if you’ve already built the MG version. It has very little of that kit’s flimsiness and most of its major issues seem to have been very consciously and directly addressed, like the idiotic way the knees transform. Don’t think this is a super-sturdy toy or anything either, though – it still has parts that pop off everytime I transform it.
Still, though, the long and short of it is that this is without exaggeration the greatest model kit I’ve ever built. It’s really that good. I immediately went online and ordered another one, plus a Banshee and another LED kit. I don’t even know what I’m going to do with all this stuff, I just had to have it because this is now my favorite model kit in the universe.
So that’s it for this one. Please leave a comment if you’ve actually read this far, I’ll write more if there’s interest in these ramblings here; I actually build more Zoids (HMM and the originals) than I do Gunpla, and I could go back and review some of those, plus I’ll probably be doing another HMM Zoid soon.

2 comments