
Tagged: geara zulu

HGUC Geara Zulu
Somehow it’s been over a year since I did my last proper painted Gunpla build, and to be honest, I was feeling the ol’ Gunpla fatigue more than a little. I actually snapped this kit together a long time ago and originally had some plans to either modify it into a space Nazi robot or something Warhammer related, but then I badly needed to do a simple and straightforward project to get myself out of the usual spring funk, so I decided to just paint it up more or less straight.

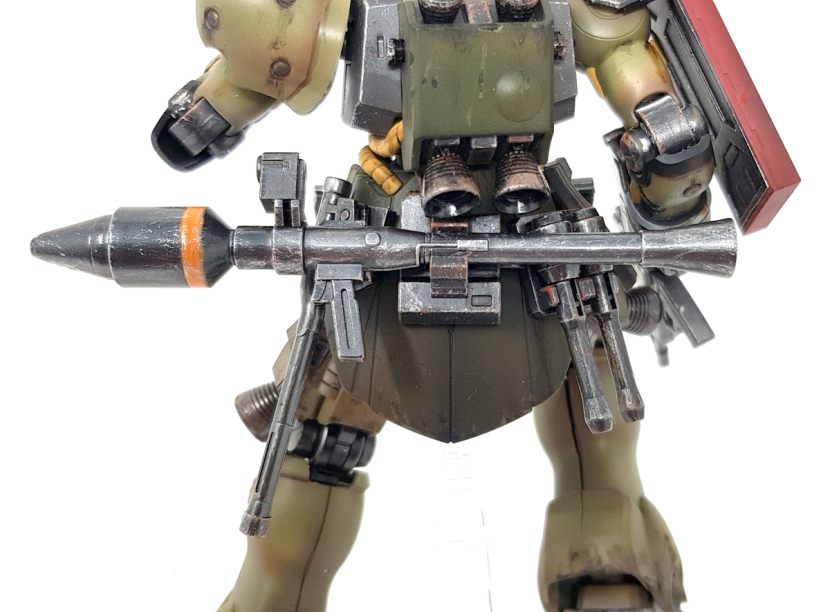
The base color scheme isn’t much different from the kit’s original colors – the dark green is Tamiya Olive Drab, the lighter green the same paint with white mixed in, and the mechanical parts and weapons are Vallejo Metal Color Gunmetal. What’s new here is that I did the preshading on the light green parts with Vallejo’s Burnt Umber, which I’ve used as a shadow color with green on miniatures before, and it worked really well here too. I also added some black trim, which mostly just reminded me that I hate masking.
The sleeves markings also didn’t work out as well as I had hoped. I’ve done this sort of thing simply by hand brushing on so many Warhammer minis at this point that I didn’t think it’d be a problem to just paint Mechanicus Standard Grey over the Nato black I’d used as a base, but Bandai’s trim is decidedly more shallow and it turned out to be a massive pain. A wash of Nuln Oil and some weathering hides most of the problems I had, but I’m not entirely satisfied.
For the shield, I couldn’t resist my usual impulse to paint it a different color to make it look like it had been replaced, so I used the same red/red brown combo I’d used on the Red Horn before and slapped a decal from the generic Unicorn waterslide sheet on it.
And finally, the tubes were painted Desert Yellow with a bit of Lemon Yellow mixed in to brighten up the color a bit.
After the gloss coat came the pin wash, and partly because Bandai plastic and white spirits don’t get along, I settled for water-based acrylic washes this time – Citadel Nuln Oil for the dark green and the gunmetal, and Agrax Earthshade for the green. This worked just fine and dandy. Purely for pin washes, I always find that water-based paints actually work quite well because the surface tension tends to make them pull into the recesses.
The first weathering step was chipping, which I did in two stages as before on the HMM Zillon. I used two different shades of green from Citadel for the first step, but truth be told, I really should have used something even lighter on the light green parts – the green chips are barely showing up. The problem here was that the gloss coat was almost too overpowering and I could barely see what I was doing. Stage two, as usual, was Tamiya Gunmetal on the lighter stuff and Chrome Silver on the darker parts, in this case just the black.
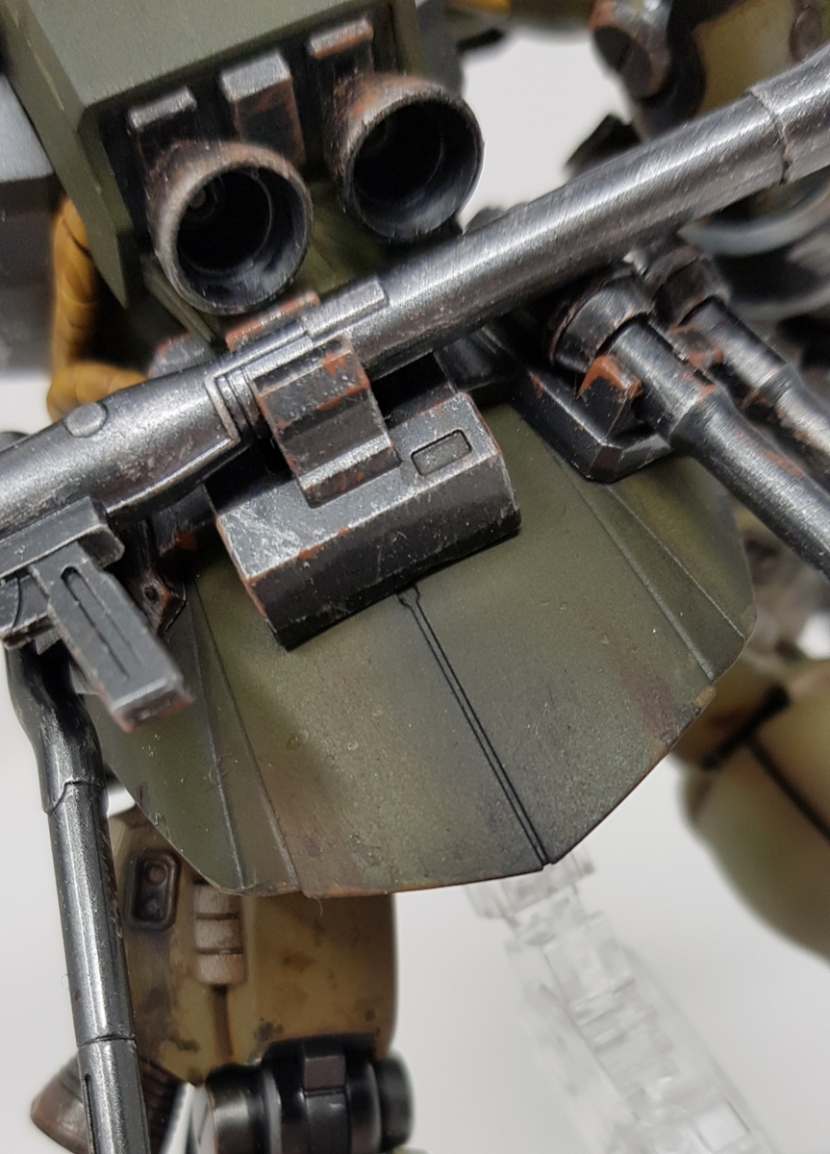
Next was streaking with Abteilung 502 Starship Filth and Dark Rust. I applied a tiny bit to the spots I wanted to have streaks running from with a toothpick, then basically drybrushed downward from there. This worked so well that I decided not to add further streaking on top with thinned-down paint, as I did on the S.A.F.S. before.


The weapons and all the other gunmetal parts got the usual treatment of a drybrush with Tamiya Chrome Silver and Gunze Rust, plus some added detail here and there with Leadbelcher. Decidedly nothing fancy, but this is honestly one of those things that work so well that I’d rather take the “don’t fix what ain’t broke” approach and just keep doing it. I also added that orange stripe to the bazooka because I have to have an orange stripe on everything. This was hand brushed on with Citadel Fire Dragon Bright, which was kind of a pain over the slick surface of the Vallejo metallic paint, but I figured the drybrushing and the topcoat would make it blend in, and… they did.
As usual, the final step was to paint the cameras with Vallejo Duraluminium, Tamiya Clear Red and my latest trick of dabbing some Citadel ‘Ardcoat on them for extra gloss. This mimicks the look of actual clear parts really well, and I’m particularly happy with how reflective the monoeye came out.


Well, and that was pretty much it, plus of course a Tamiya matt topcoat. I really didn’t do much of anything fancy with this one, but it was really fun to do, and I will say that closing up the seamlines on the legs and the round shoulder armor at least was not entirely new, but the first time I felt kind of comfortable doing that, and I think I can tackle models now that need seamline filling more badly.
I also came away from this one feeling like I need to do more HG kits – with a little love, they can look nearly as good as MGs, and they’re a lot of fun to work on because of the significantly lower parts count. There’s never a stage with these where it feels like you’re spending an entire week just basecoating inner frame parts.


