
Tagged: aile strike

Perfect Grade Aile Strike Gundam Painted Build, Final Review
Those of you who follow this blog regularly should probably both know that I will be repeating some things here that I already talked about in the WIP updates and on Youtube – the only thing that’s new is the Aile Striker and a few more accessories. So you might want to scroll down to that part, although I do have a few new pics along the way.
My usual philosophy is always to try something new on every build, but with this one I took a slightly different approach. For a number of reasons, among them the fact that it’s a frickin’ PG and complicated enough as it is, I decided to treat this more as a milestone build and just throw every technique I’ve learned over the past year and a half at it. Things I know will work, basically. That’s why, for example, the color scheme is the same as on the Master Grade Mk-II – that’s my personal version of the Gundam colors, I know I like the way it looks, and so I used it again here.
I still ended up doing a few somewhat new things – that just seems to happen kind of inevitably. I’ve never actually done a gunkwash over pre-shading, or on any painted Gunpla, for example, or this much detail painting on the inner frame, or this much masking. But that’s just more of familiar things or combinations of techniques that I’d used before.
The general process here was basically the way I approached the RX 78-2. I painted and weathered the armor first, then took it all off again for topcoating, and dismantled and painted the inner frame.
After priming, I pre-shaded the white and off-white armor pieces with light grey and the red ones with black. The blue pieces were primed black, painted flat and then highlighted with my own custom mix of blue and green that I’ve used before on the Mk-II.
The big news here is that I really think this one is the build where I finally got my preshading dialed in. As you’d expect with anything airbrush-related, most of it had to do with mixing ratios. I figured out that I needed to thin the shading paint much more than I usually would so that it would spray evenly at low pressures and not give me specks all over the place, and then just be, y’know, really really careful not to produce any spidering because the paint was so thin. If you’ve been following this blog, you should know that preshading has been sort of an ongoing struggle for me – I’ve always loved that heavily preshaded Japanese style of painting, but I could just never quite get it right, so getting the look I wanted, and on a complex kit like this, is really satisfying.
Anyway, after the pre-shading, I sprayed my usual custom mix of Tamiya’s red and red brown over the red parts for that muted look, white for the white parts and a mix of white with a few drops of light grey for the off-white.
The next step was a gloss coat and then waterslides. Because Bandai refuses to make waterslides for their PGs, I had to resort to third party again, but I’m very happy to report that the ones I used here, from DL, turned out to be almost as good as Bandai’s. The print quality is excellent, they’re pre-cut with razor-sharp precision, and they’re very easy to work with. Although that’s partly due to their one downside, which is that the carrier film is just a teensy bit too thick for my tastes. That means it’s easier to move the decals around and not have them crumple up and fold in on themselves, but they just don’t look quite as painted on as Bandai’s.
After decals came another gloss coat and then a gunk wash with Abteilung 502’s Starship Filth. Here I ran into my first real problem with this build. Like on the Storm Sworder before, the surface quality of the gloss coat wasn’t quite as slick as it should have been on all the parts, and I was more concerned with not filling up the panel lines, so I didn’t fix it. Turns out that on light colors, the difference in how the oil paint tints the color when you wipe it off becomes more pronounced, and it also became an issue that the shaded and plain areas had different surface qualities that still poked through the topcoat. I was able to fix this more or less by using a little oil paint thinner on those pieces where the paint wouldn’t wipe off as much as I wanted to, so I ended up with reasonably uniform shades of white and off-white, but it did affect how much of the Starship Filth remained in the panel lines and crevices, and so now the panel lines aren’t as uniform as I would’ve liked them to be. Not a huge issue because gunk washed panel lines definitely read more like a weathering effect and thus shouldn’t be entirely uniform anyway, but definitely a lesson learned for future builds.
After the gunk wash came another top coat, and then I could finally slap the armor back on the still unpainted inner frame to see what it all looked like.
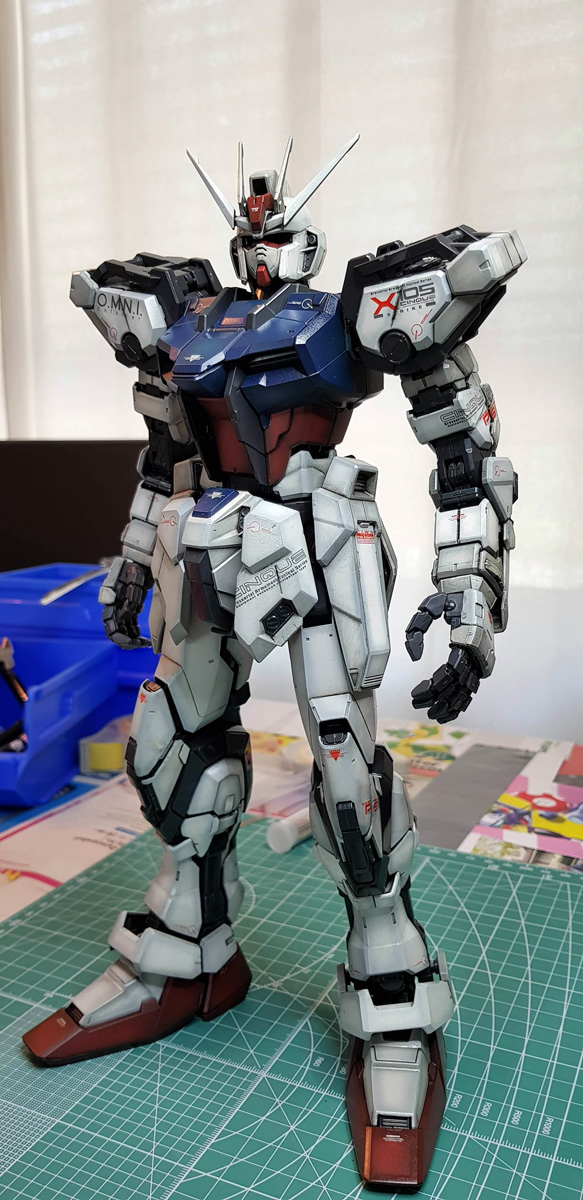
And it’s a good thing I did because seeing it all put together like this, you really notice that between the preshading and the gunk wash, it already looks very faded and worn, and you could really leave it like that. I had already resolved at the start of this build that I wasn’t going to weather the kit as heavily as I usually do, but this test assembly made me restrain myself even more. In fact, I still like this look so much that I’m probably going to paint another kit like this soon and not do any further weathering.
So I did the usual, just less of it. First I drybrushed all the edges with the base colors for highlights, and then I went back to chipping with a detail brush instead of drybrushing all over the place. I’d previously done this successfully on the Gun Sniper and, let’s say, less successfully on the RX 78-2, but it was clear that the drybrushed approach was going to be too much here. I only drybrushed scratches in a few places like on the feet or around the shoulder joints where I thought more wear and tear would occur, the rest is all done with a tiny brush and lots of patience. I must say I’m pretty pleased with how it came out, although of course it’s also a bit easier on a larger scale kit.
The colors were the usual – Tamiya chrome silver for the red and blue, gunmetal for the white and a few dabs of Gunze’s rust here and there. Then I drybrushed the customary heat streaks around all the vents and the head vulcans and added just a small handful of rust streaks with Vallejo’s Dark Rust and diluted india ink, basically to some of the bigger chips that I had previously added a dot of rust to as well. When I decided to add a bit of Vallejo’s Engine Grease to have grime streaking out of the knee joints, I started to run into trouble (the streaks on the left shin are much more than I wanted), so I took that as my sign to stop. Well, actually, I also sponged some Tamiya Brown/Light Grey on the feet and then stopped. I did mention I repeated almost every single technique I know here, right?


Here are a few pictures of weathering details from the finished build. Obviously this was after I’d also painted the inner frame. With just the armor painted, it looked like this.
And then I had to take it all apart for topcoating and to finally paint that inner frame. First I snapped a series of reference pictures, though, so I would remember which parts of the inner frame would be visible; I did want to do a fair bit of detail painting, but I had no intention of doing a full paintjob on the inner frame just so I could take a few pictures and then hide it under the armor forever. It’s awesome when other people do that, but it really just bugs me when I spend a lot of time on stuff that I then can’t display, even if I’m almost the only one who ever looks at my shelves anyway.
The general approach with the inner frame was first to settle on a relatively simple color scheme – gunmetal over black primer as the base color, then chrome silver, gold leaf and red for details. There are a tiny handful of parts that I base painted in silver or gold, but almost everything was painted gunmetal. Then I made sure I painted similar looking details in similar colors; gold for pistons and round screw-like parts, silver for raised panels, and red for smaller tubing and a few recessed squares that I decided might be lights. Finally, I drybrushed everything silver on the gunmetal and white on the gold and silver, plus rust on everything.


As you can see, the end result was that it gives a nice sense of depth and detail to the inner frame where it shows through the armor plates, and a few cool effects with mechanical detail being revealed as the joints are moved, especially in the knees. The legs in general I’d say are not only my favorite part of this kit engineering wise, but also where I probably did the best job with the details, but it was also easier because there’s so much cool stuff to work with.
Another new trick I learned here was to paint the frame in sections; I did the torso first and then one limb at a time. This allowed me to keep one limb completely assembled as I worked on the other one, so it was much easier to see what goes where and how it should be painted. I don’t know if I’m going to repeat this approach on the next MG I build, but for something this complicated, it really helped.


And then I could finally slap the armor back on and put it all together.
And that brings me to what you all know it brings me to – accessories.
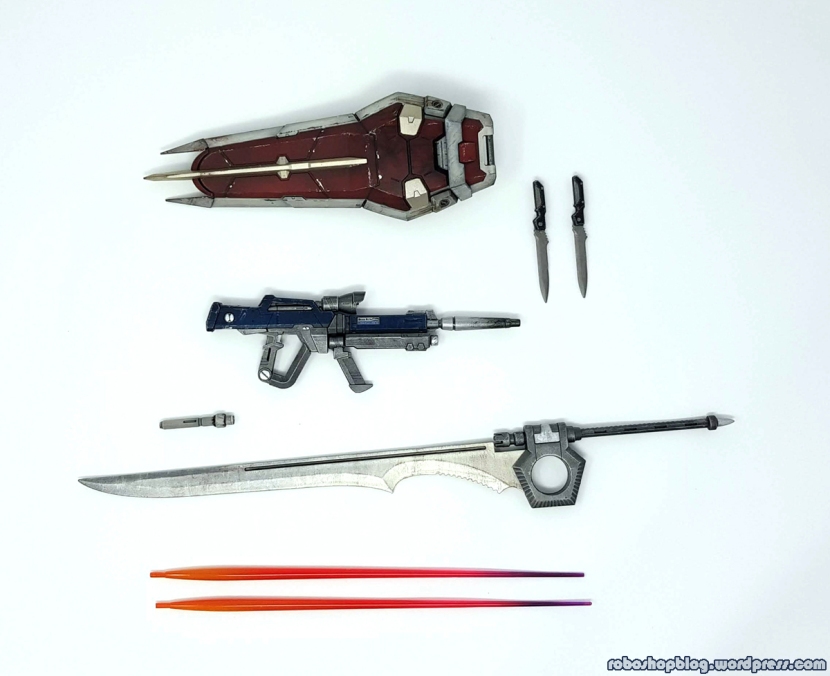
With the base PG Strike kit, you get the beam rifle, the shield, the Grand Slam sword and the Armor *snicker* Schneiders. The beam sabers are included with the Skygrasper/Aile Striker kit, so I tossed them in this picture here.


I painted the inside of the rifle gunmetal with a few silver details here and there, especially the barrel, which needed to be masked. The outer casing is the same blue over black with highlights, drybrushing and a gunk wash as on the suit, just with a lot more drybrushing because I thought the weapons would have more wear and tear. The camera is clear red on the outside and silver on the inside, and I did the usual soot/heat streaking around the muzzle. I’m thinking on a future build I’ll try actual heat discoloration, but you know what the theme for this one was.


The shield is the same red and white with pre-shading as on the suit, titanium gold for the yellow parts and gunmetal with a few silver details for all the mechanical stuff, including a few details and the handle at the top that I painted at the end, as usual, to keep them shiny. As you can see, the inside of the shield is gunkwashed with a lot less cleanup than I usually do to give it this dirty appearance. There’s also pre-shading under there, but you can barely see it anymore.
The mechanisms for the moving handle and the small blast shield were a bit of a problem. I left the clip the handle attaches to unpainted, but it’s so tight now that I don’t really want to move it anymore. And the blast shield was hard to move before the shield was painted, so I knew I’d have to sand it down a good bit, but even after doing that and a lot of test fitting before I assembled everything, it’s still hard to move.
Oh yeah, and the clear part in the… I dunno, the peephole, has the same light grey sponged-on dirt I usually do on canopies.
Since I don’t particularly care for the Grand Slam sword and the Armor *snicker* Schneiders, I kind of broke with the theme for this build and used them as an opportunity to experiment a little.
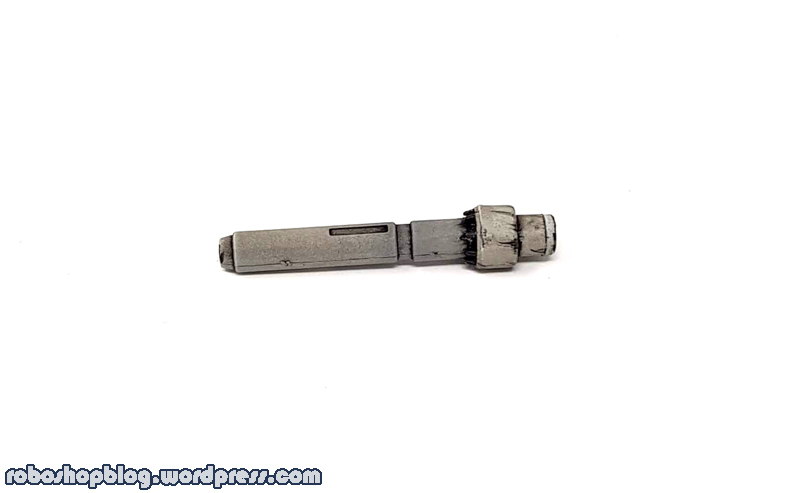
The tennis sword, of course, comes with a chrome coated blade, and once I had painted the handle and put it back together, it became 100% clear that it looked unacceptable. Bandai’s mekki plating is nice and all, but next to properly painted parts, it just still looks too toylike.


That left me with the problem of having to strip the plating off the part, which I’d never done before. After two failed attempts with bleach and a mild degreaser, I bought a bottle of concentrated car degreaser from the local hardware store, soaked the blade in the stuff for a few hours and poof, gone was the chrome coating with zero damage to the part. I’m really glad to finally have found a product that does this for me, and I’m thinking I’ll use it to strip paint in the future as well.
Then I primed the blade with Vallejo’s gloss black primer that I’d discovered while I was working on this build and thus hadn’t used elsewhere.


And then I decided to just try some silly stuff and see what it’d look like. I also bought a few of Vallejo’s Metal Color paints to experiment with, but I decided to stick with the Tamiyas so it wouldn’t clash too much with the other metallic stuff on the kit (which is dumb and I’m dumb for doing this dumb thing, I’m just explaining my reasoning.) But instead of just painting it straight chrome silver, which seems like the obvious thing to do, I first painted the whole blade gunmetal, then added a gradient of gold leaf from the hilt, then a thin coat of chrome silver on top. This ended up doing exactly what I’d hoped it would, which was the illusion of an iridescent surface; you can’t quite tell what color it is because the lighter areas with the gold underneath seem to be that way because they’re catching the light, but they’re actually not.
But of course that looked too pristine, so I drybrushed all over the blade with silver, titanium gold, gunmetal, white and rust to make it look all beat up. It kind of ended up taking away the iridescent effect, and now it looks more like it’s so worn that you can’t tell what color it is anymore, which is also fine.
In fact, I now like this sword so much that it kind of sucks that I can’t use it.


The armor tailors, as I’ve complained about before, are a problem because they come pre-assembled on the same sprue as the hands, which makes it unnecessarily hard to paint them. When you really think about it, though, even if the blades were separate pieces, the first time you fold them, you’d scratch half the paint off of them anyway, so it really doesn’t matter.
Now I could’ve masked the handles and airbrushed the blades, but I had just picked up some Citadel paints and decided to give those a try instead. After all, the worst thing that could happen was that I’d ruin an accessory that I wasn’t going to use anyway. The only reason I painted these in the first place was because the idea of not having painted everything that came with the kit bugged me.
So I used Lead Belcher, which seems to be sort of the go-to silver color in the Citadel range, on the blades and the detail on the handles. I have to say this stuff is almost as good as I hoped it would be. It still takes about three coats to get a good even finish and you still have to be careful to get the thinning ratio just right, but it’s a hell of a lot easier to do than with Tamiya acrylics, and the end result looks about as close to airbrushed as any hand painted surface is ever going to look.
Not much to say about the beam saber handles. The part that I guess you’d call the cross-guard is nicely detailed, so I painted those parts gunmetal, and I did the usual heat streaks (because beam saber blades cause heat streaking because science and no, I’m not going to stop running this joke into the ground), and of course they’re pre-shaded, gunkwashed and chipped.
You might also notice in the picture that the paint is basically stripped towards where the effect part plugs in – that’s because the slots they fit into on the Aile Striker are too tight. I may go back and remedy that with modding, given that I have a second complete Aile Striker kit, but for now, um, yeah.
As for the effect parts, I had that same reaction to them as I did with the Grand Slam blade where it suddenly bugged me how toylike they looked in unpainted form, so…


The original idea was to paint them clear yellow at the bottom, but that didn’t work at all. Lighter clear paint on darker clear parts does basically nothing. So I added a gradient of lemon yellow instead and kept it very light so as to not go fully opaque, and that worked very well.
I then painted the tips blue – the idea was to have a gradient from a warm to a cool color here, basically, and while that makes sense in theory, I kind of feel like the purple that resulted from painting the tips makes the parts look a bit too much like candy. I’ll probably do the yellow at the bottom again, but no more blue on the tip.


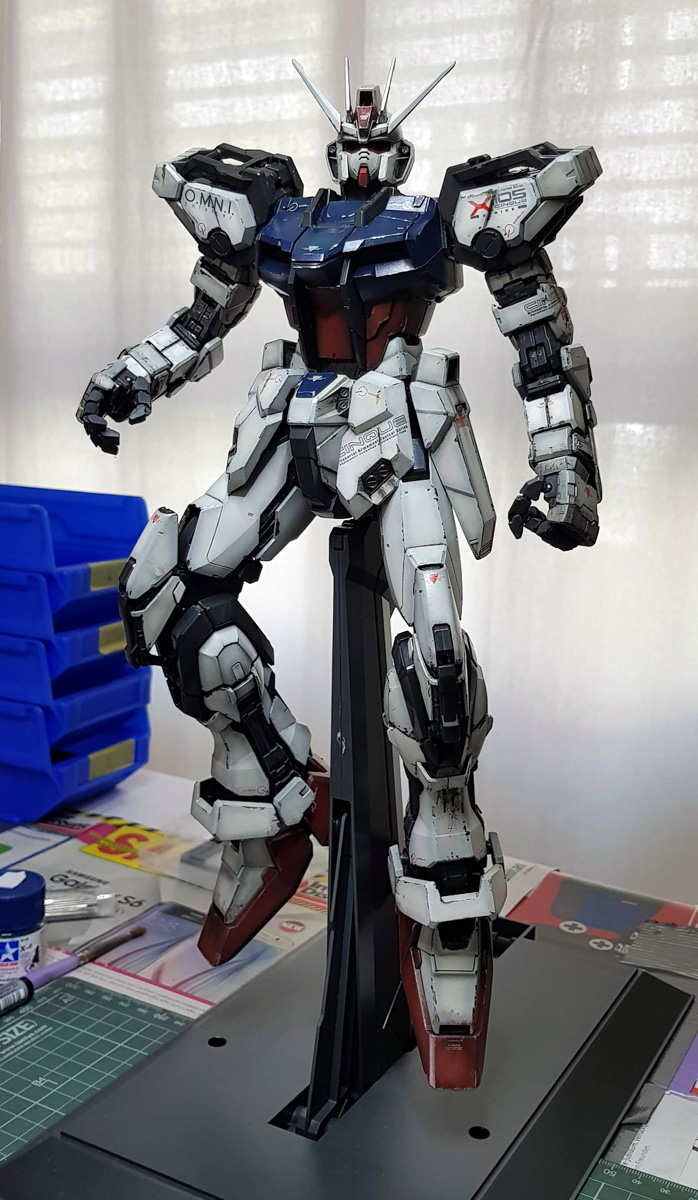
And that’s our opportunity for another pose gallery. I think the only thing I have to say here is that if you don’t want to shell out the extra bucks for the Aile Striker kit, you’ll still get a heck of a PG with the Strike.
But as far as this build’s concerned, saying that is just my segue into talking about the Aile Striker.
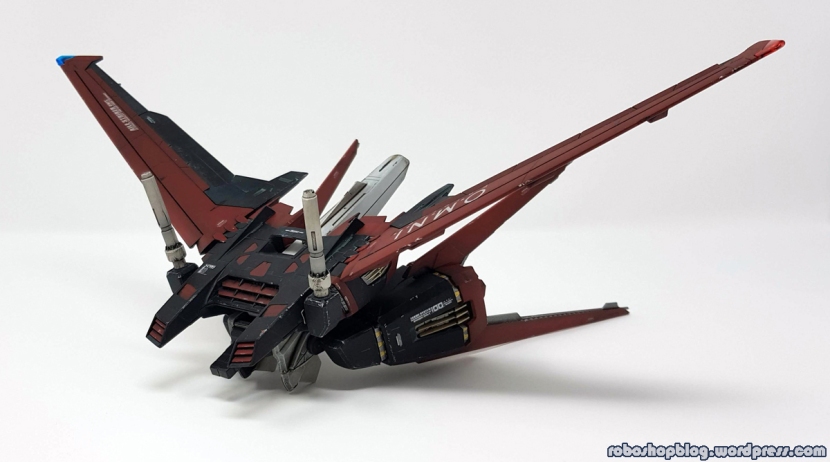
Now the first thing I needed to figure out was something I had basically been putting off since I originally snap built the suit itself. Back then, I promised myself that I would snap it together before I started painting anything to make sure I had a clear plan for the color scheme. Well, I didn’t. And what I’d never figured out was what to do with these dark grey parts that are molded in more or less in the same color as the inner frame of the suit.
One thing I considered was gunmetal, but that would have raised a whole host of problems with glossy and matte surfaces right next to one another, and I also thought it didn’t really make sense for the outer hull here to be the same color as the inner frame elsewhere. So I ultimately settled on black, despite the fact that I hadn’t used black anywhere else on the kit.

Now that in itself was fine, but now I had to figure out how to weather this stuff. What I’d normally do with black is just drybrush silver all over it, but that results in a much more heavily weathered look than what I wanted here. So after some experimenting on spoons, I decided to do a gunkwash instead, with Abteilung 502’s Ghost Grey. That’s how I got these bluish-grey panel lines and the accumulated dirt in the recesses that you see here.
That was followed by edge highlights with Tamiya light grey and some chipping.


Now as you can see here, I also did some masking to add color separation. I have to say if there’s one disappointment I have with these two kits, it’s the lack of complexity in the Aile Striker (and the Skygrasper, for that matter.) Its proportions are about as perfect as they possibly could be, but just out of the box the lack of color separation makes it look really bland and toy-like. So I just painted some of the detail in the same red as everywhere else.
The rest was fairly straightforward and just followed the color scheme and weathering steps of the suit itself, really. I also added a few extra decals to break things up, and of course the position lights on the wings are painted with clear paints. No silver on the inside because I figured it’d just scrape off when I attach the parts.


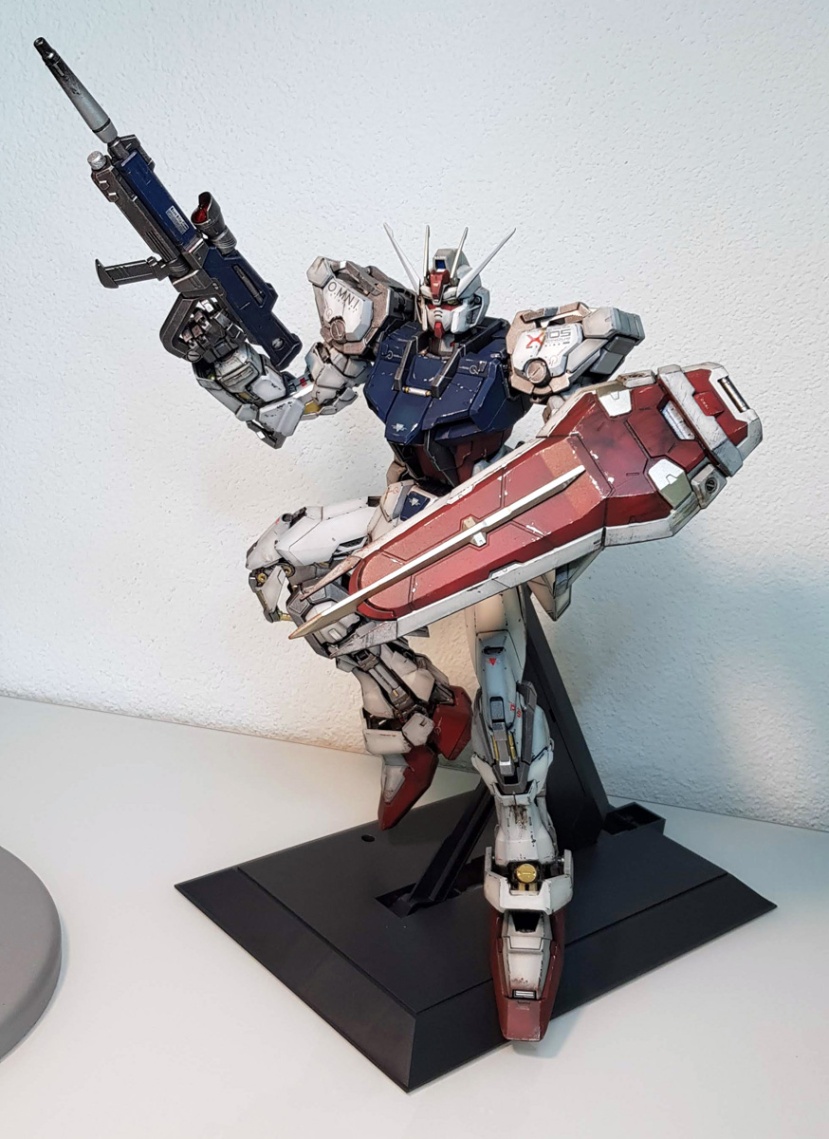
And with that, the build was finally complete, at least until I decide to make the base more interesting.


I really feel like this is my best build yet by quite a large margin. There are mistakes and things I’d do differently if I could do it again, but the overall result is about as close to what I wanted as it could have been. I’m especially happy about the fact that I pulled off the more restrained approach to weathering that I wanted to take here, and seeing the result of that has definitely taught me a lot about how important it is to apply weathering in moderation and how the different stages complement one another. And as for the “milestone” approach, it’s probably not that surprising that I still ended up having to try new things.

Now as I’m writing this, I’ve already got a list of new techniques in my head that I want to try, and old ones that I want to go back to and give another whirl, so while I may have been a bit worried that throwing everything in my toolbox at one build would end up make me feel burnt out, it’s actually done the opposite. I dunno, guys, there’s just nothing negative about this build, it’s been an absolute blast working on this, and it’s made me a better modeler and hungry for more. I hope you all at least get a kick out of looking at the pictures.

Perfect Grade Aile Strike Gundam WIP 3: All Done!
Welp, I finally finished this build today, almost a year after I’d originally snap built it. I have a long writeup in the works about all the details and I’ll also still do a proper photoshoot, but for now, here’s another long, rambling Youtube video:
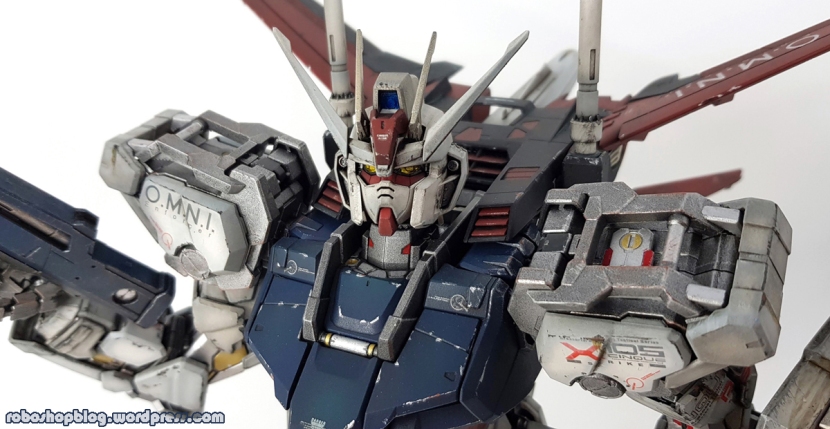
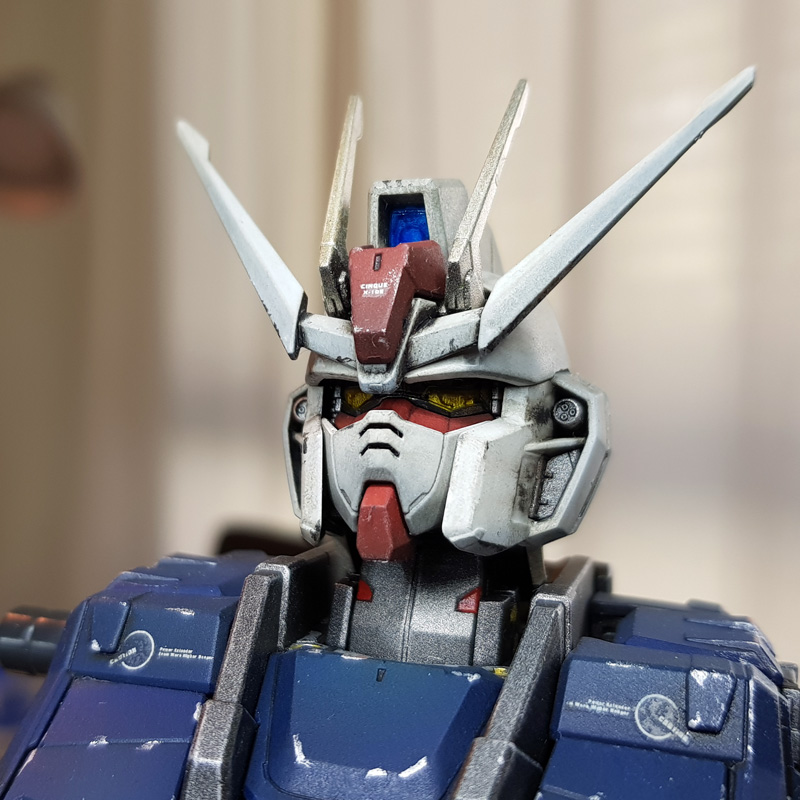
And here’s what little I managed to snap in the way of pictures today. It’s gonna be hard getting some good pictures taken of this kit with my crappy equipment, we’ll see what I end up doing about that. One thing these pics have going for them, though, is that this is the first time I managed to capture the sheen of the eyes. I don’t know why that worked here, but I’ll have to try to reproduce it when I do the proper photoshoot.


Anyway, the short version is that this is far and away my best build ever and I’m really happy with it, but I’m also kind of glad it’s over. I’m really sick of working on this thing at this point, to be honest, and I need to… move on with my life.
As for the kit itself, I really can’t recommend it enough. The PG Strike is absolutely fantastic in every possible way, and while the Aile Striker is a bit lacking in detail out of the box (I did a lot of masking and took some liberties with the decals to remedy this), the proportions are just about perfect. Great kit, and lots of fun to work with.

Perfect Grade Strike Gundam WIP 2
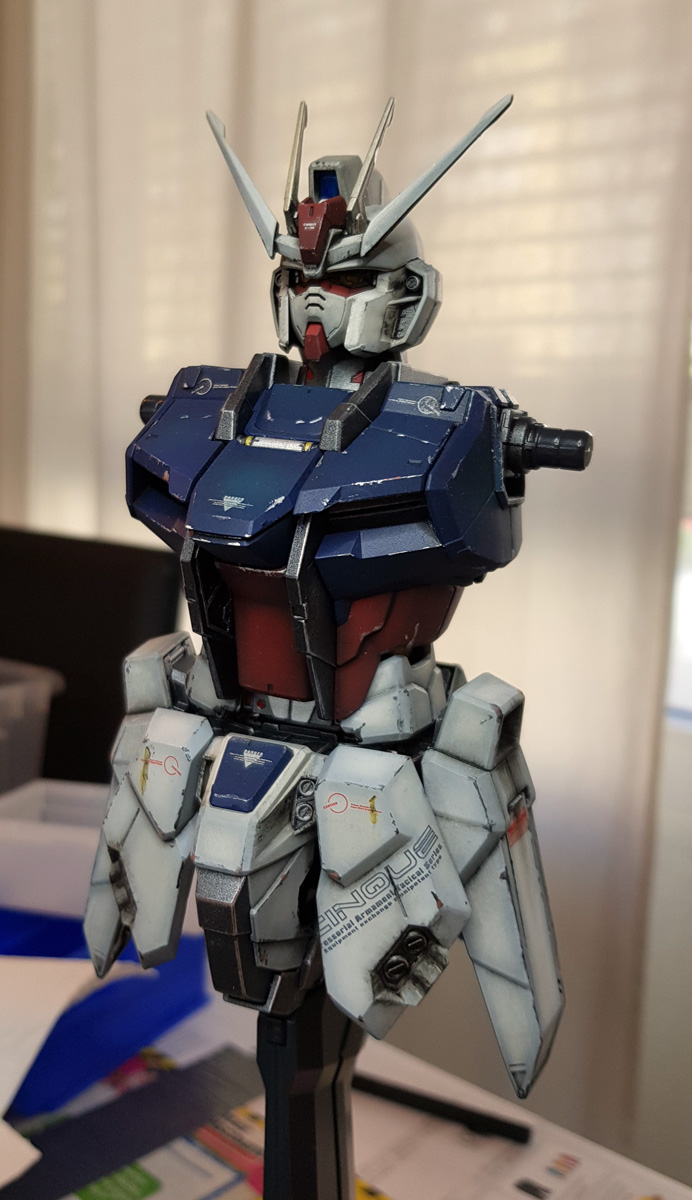
Sooo…. after trying and failing to get decent pictures taken yesterday, not to mention I realized I forgot to take pictures of the “naked” inner frame on the limbs, I did a little better today. Truth be told, I’m still not entirely happy with these pics, and I’m a bit worried about how I’m going to do a decent photoshoot with this thing once it’s all done, but it’s good enough for a WIP update. Like last time, you can also check out my progress on Youtube.
After sort of half-heartedly plugging away at painting the armor on this kit for literally months, I suddenly felt motivated now and actually got the entire rest of the inner frame done in about a week. I think finally seeing the torso and the head put together just made me see the light at the end of the tunnel, and I was also really happy with how it came out and wanted to see the kit finished.
Which isn’t to say that this build is done – as I’m writing this, I’ve started working on the Aile Striker, and I still think I might want to paint the base. I also finally managed to get the chrome stripped off the Grand Slam blade, so I’ll paint that as well, though I don’t know if I’ll have any use for it in the end, to be honest. And I might still paint the Armor *snicker* Schneiders, but that’ll really just be so I can tell myself I did everything. I have zero use for these stupid things, and I don’t see how I’m going to keep them foldable, so I also can’t stash them in the skirts.
Anyway, here’s what the legs look like.


My approach here was basically to decide on a color scheme first – silver, gold and red, all Tamiya. Then there had to be some sort of internal logic to how I painted the details. It’s not like any of this stuff actually does anything, but painting similar details in the same colors, I find, helps it look more like it could be actual mechanics. So pistons and all the round screw-like parts were painted gold, and I used red for small pipes to make them look a bit like they might be thick electrical wiring. I also used red for some recessed rectangles because I thought maybe those are lights; this isn’t a train, after all, it’s a robot from the future, so I’d think it has all kinds of electronic doohickeys making it work. And finally, silver for raised panels, basically to add some depth to things.


What ends up happening once the armor’s on is that a lot of the gold and silver sort of half shows through the gaps in the armor, which is exactly what it wanted; it suggests that there’s all kinds of moving clutter under there. And some of the detail, especially all those red tubes in the knee, only shows up when you bend the joint. To me, this suggests that this stuff is a bit more fragile and so has to be in a place where it’s covered by armor most of the time.
All of this was hand brushed with the exception of the silver on the back of the knee. I airbrushed those parts silver first, then masked off the area that’s silver now and sprayed gunmetal on everything else, followed by the red and gold details.
The hand brushing worked well enough , but as everyone knows, Tamiya paints are kind of a pain to hand brush, and I’m going to give Citadel a try soon. Tamiya’s are fantastic for airbrushing, but I’m really sick of dealing with how poorly they hand brush.
I’m also not entirely sure how I feel about the way the drybrushing affected the detail. On the one hand, it hides some of the imperfections, but up close I’m never quite sure if that’s really what it does or it just makes everything look messy. I got some of this stuff to look pretty sharp, and now… I dunno. I think I’ll try to go more subtle with the weathering next time I do a lot of detail painting.


The arms got basically the same treatment, but there are fewer parts and generally a lot less detail that’s actually visible, so there was just less to work with. My personal favorite is the gold piston that’s facing inwards on the lower arm armor and only really shows when you bend the hand away from it.
I really should have painted that gold panel on the elbow gunmetal instead, though. The way I went about everything was, I completely dismantled one of each limbs and kept the other one intact so that I could use it for reference, so with about 95% of what I did, I was sure of where it would end up and what it would look like, but it just didn’t occur to me that the gunmetal I painted on the elbow joint would read as being a different material underneath the silver showing up in gaps, if that makes sense. Not to mention, as you can see, the bicep armor has already damaged the gold. I’m pretty sure this is the only place on the kit where I have this problem. I guess I can get away with pretending it’s weathering (the armor really would scrape there), but… ergh.
For the most part, the one limb at a time approach worked really well, though, and I certainly recommend it for complicated kits like this one. I also don’t think it made it at all more time consuming, I could actually get through the second set of limbs pretty quickly because I had them all figured out from doing the first two.
Some of the opening hatch gimmicks don’t work anymore – the sliding panels on the chest, as I said in the last blog, and unfortunately also the cool looking ones on the legs that flip open to the side. I decided pretty much during the snap build already that those weren’t going to be useable – even unpainted, I could only ever open them with a toothpick, so they would’ve needed to be modified to keep them functioning, and I don’t think I’m going to be displaying the kit with the hatches open much. I did want to do the ones on the shoulders, though, just because the detail underneath looks so cool.

Nothing you wouldn’t expect, of course – red tubing, silver raised detail, gold for some of the smaller stuff. I also masked off half of the outer flap that the thruster sits on so that it could be gunmetal on top and silver at the bottom.
And this is where we are as of now. I don’t know why it’s so hard to get a good picture of this guy, you’ll just have to believe me that this is one of about 30.
Anyway, overall I’m really, really happy with how this is coming along. I’m spending a lot of time bitching about all the small mistakes that bother me in this blog, but being honest with myself about what did and didn’t go well is how I get better. And with all creative work, that’s ultimately the only thing that matters to me. Not to be the best modeler out there, but a better one than I was yesterday.
Also, I really have to say again what an absolute joy this kit is to work with. With the exception of what the elbow did to itself, everything here is so well designed that it still works fine after painting (although I did do a lot of masking on the moving parts, obviously), and despite it being an extremely complex kit, it’s just fun, top to bottom, and it looks amazing.
We’ll see when I can post the next update here – I won’t be around much over the summer, so I’ll just be chipping away a little at a time on the Aile Striker from here on out. I’m kind of hoping I can do something or other with the release of Zoids Wild, but not before the start of July.
Perfect Grade Strike Gundam WIP 1.5
I wanted to post a huge WIP update on my Strike today, but as it turns out, I’m having rather massive problems getting decent pictures taken of this damn thing because it’s too big. So instead, here’s my Youtube video. Rest assured that I’m not abandoning this blog for Youtube, but I wanted to get this update out there one way or the other, and if I can’t post the blog, I thought I should at least post the video here.
Anyway, the short version is, the MS, the shield and the gun are done, and I’m moving on to the Aile Striker.

PG Strike Gundam: WIP
If you just got here and your first reaction was “I’m not reading all that”, you can also check this build out on Youtube. This blog has far more info than the video, though.
Anyway, I don’t usually write WIP blogs, but I’m not sure I’ll have anything else to post this month, this build is likely going to drag into July, and I’m really itching to talk about it a bit. I’ll have a full review and photo gallery whenever it’s actually complete, but in the meantime… here’s where I am with my PG Strike. I posted a review of the snap build almost a year ago at this point and only now just finally got around to painting the kit.
I went about this one in the same ass-backwards way as on the MG RX 78-2 3.0 where I painted the armor first and then the inner frame. This continues to make perfect sense to me because a) seeing the kit with the armor on allows me to decide which parts of the inner frame to detail paint b) if I gunk up the inner frame with weathering (or while pre-shading the head, as I did here), I can paint over it afterwards and c) I have to pry the armor off for topcoating when it’s all done anyway because I want a shiny finish on the inner frame and matte on the armor.


When the armor was all done, it looked like this. Looking at it now, I almost miss the glossy finish and I kind of wonder if I shouldn’t keep that look sometime, somehow, on a different build, if I can find an excuse.
Notice also that the stand, while very functional, is beyond ugly. I don’t know what I’m going to do about that yet, but this is unacceptable.
Also, because I did it anyway and it’s kind of fun, here’s a comparison of the four stages of painting the armor. First the unpainted picture from the earlier build review, then just pre-shaded and gunk washed, then with chipping and heat streaks, and finally with the few rust streaks I did.


I did this mostly because one of the reasons I put off painting this one for so long was that I liked it in its unpainted form. Looking at this comparison now, I don’t know what the hell I was thinking. It’s really kind of funny what a difference painting makes.
Anyway, once that was done, I decided to paint the inner frame in sections. I usually prefer to take a more assembly line approach to my builds – prime everything, base coat everything, etc. But the idea of dismantling the entire PG Strike frame and painting it all at once was… frankly soul-crushing, just thinking about it, and so I decided to break up the process a bit, mostly to keep myself motivated. It also helps navigate the build a bit, though, because you can still remember where things go if it hasn’t been a week and you’re not looking at 200 parts.
I started with the waist section, mostly so that I could mount everything on the stand as I go.


As you can see, I decided to do quite a bit of detailing on the inside of the skirts. I actually think this stuff still shows – even if you only sort of see it peeking through, your brain registers that there’s detail there and not just a big chunk of gunmetal. It was also just really fun. I’m actually seriously thinking about getting some Warhammer miniatures because I’m having so much fun brush painting the details on this kit.
And here’s the waist section all put together.


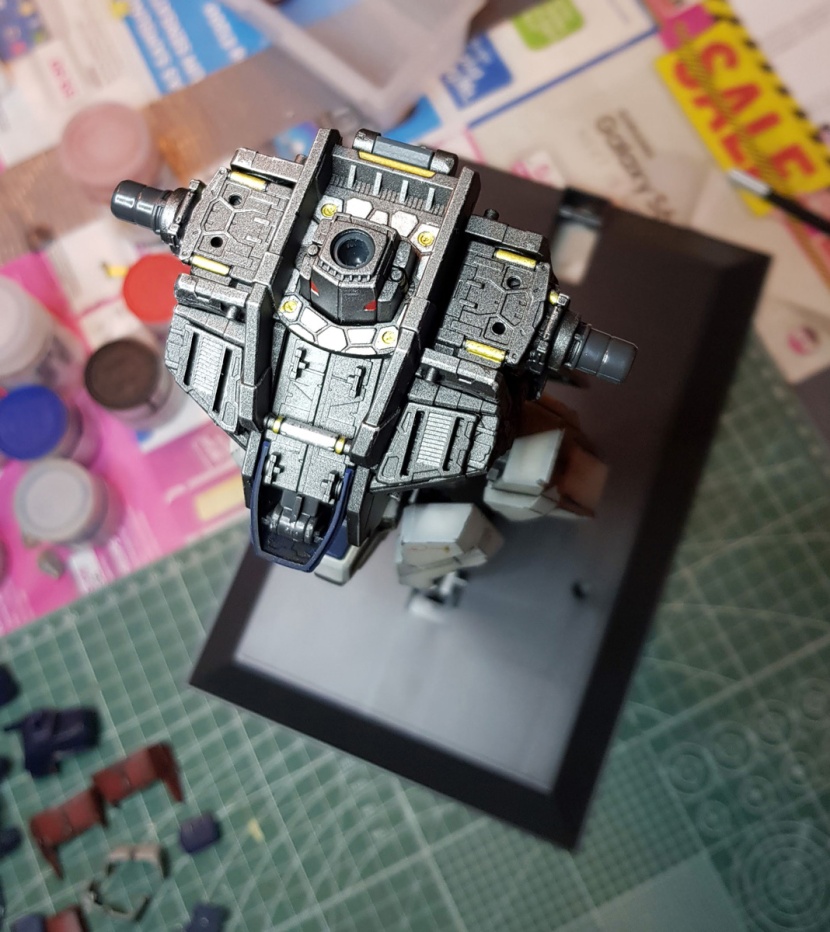
Working my way up, I did the torso next.
The lower half (you know, the actual waist, as opposed to the pelvis that we call the “waist unit”) gave me enough grief when I tried to put it together unpainted, and of course this didn’t get better with the paint on it. Luckily, this unsightly gap here isn’t visible once the upper torso goes on. Neither is the detail I painted around it, but oh well.


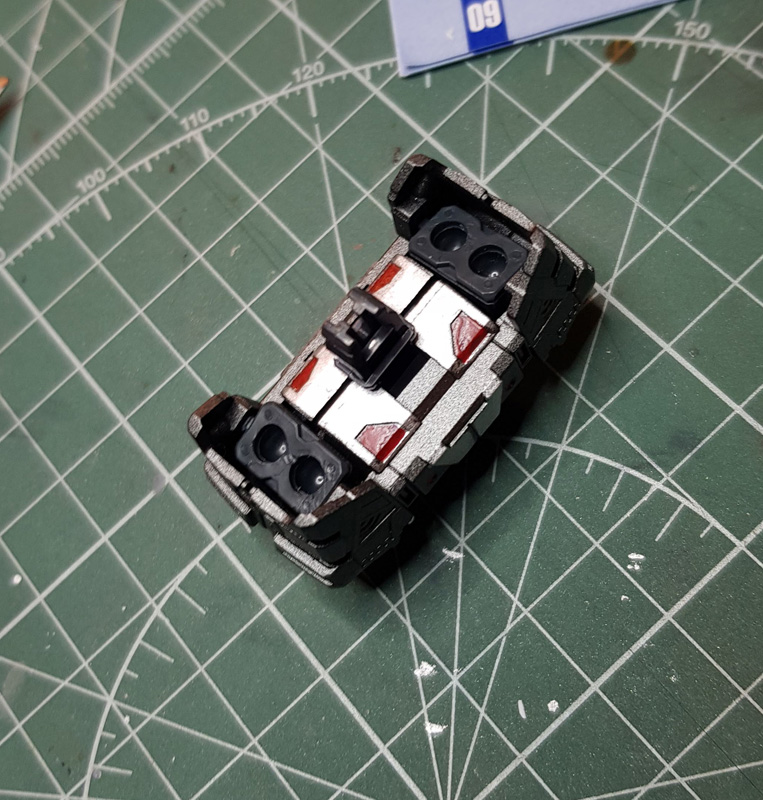
Here’s the cockpit assembly. I painted the pilot figure as best as I could given its tiny size and the fact that I couldn’t find any reference online, plus some inner detail where it’s somewhat visible from the outside.
These triangular fins are the same clear piece that’s painted clear red on the inside. On the outside, I painted them chrome silver, hoping to get a silver line on the chest vents, but you can really only see them if you peek in and the light hits them just at the right angle. Same with the gold/silver pistons next to the neck here, these get completely covered up by other parts and only barely show through a tiny slit if you know where to look.
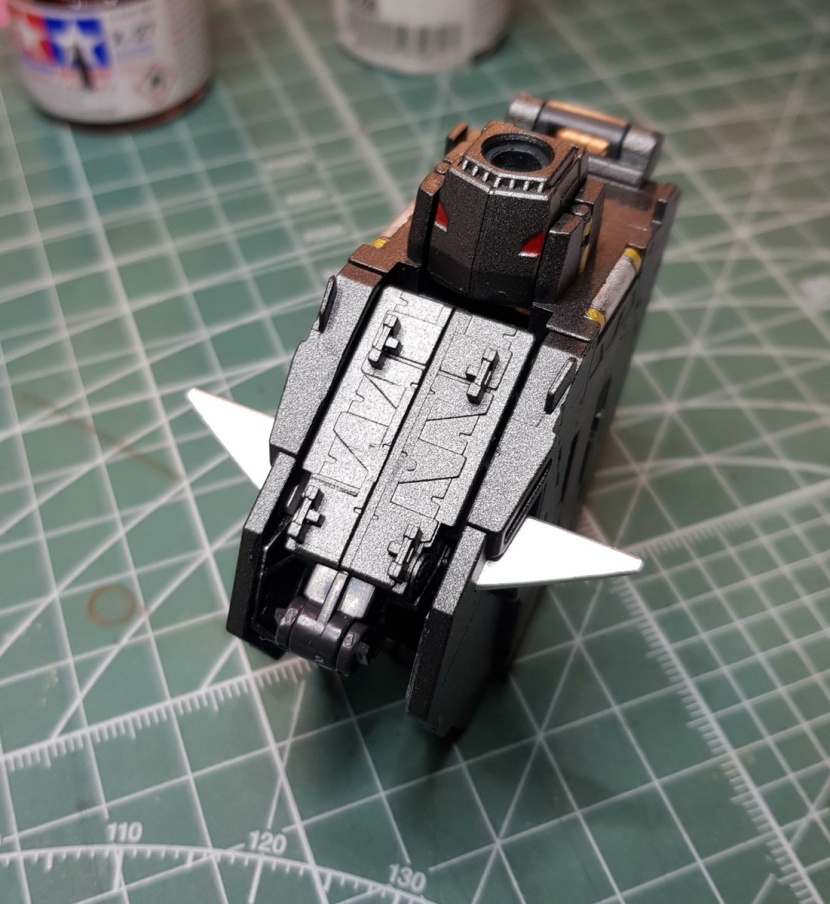
What works beautifully, though, is what I did with the collar here.
All that detail really helps make everything look more mechanical and believable on the finished assembly, and the gold pistons on the shoulders actually sort of show up as well.


And that was the torso all done. I also painted all of the pistons gold and then drybrushed them white. Oh, and the inside of the hatch on the back looks like this.

It does fold out, so this isn’t completely pointless, but once I’ve got the Aile Striker on, this’ll never be seen again.
I’ll also paint the stuff under the hatches on the shoulder armor, so at least I’ll still be able to display that if and when I want to. The sliding panels on the chest don’t work anymore now that they’re painted, but I kind of expected that and didn’t do any detail painting underneath.
I also finished the beam rifle and the shield at this point. Pretty straightforward stuff – the beam rifle is gun metal with a few hand painted details in chrome silver plus the same blue over black primer as everywhere else, the camera lens is painted clear red on the outside and chrome silver on the inside.


The shield, like the gun, is considerably more scratched up and dirty than the suit itself, but that’s very much intentional – I figure this equipment would suffer much more wear and tear and be less meticulously maintained.


One thing that bugs me here is that the titanium gold pieces (my usual replacement for Gundam yellow) were a bit too obviously not weathered along with the rest of the shield. They do have white drybrushing on them, but at the moment they look a bit too pristine for my tastes, compared to the rest. I may try to alleviate this, but the problem is that they need to be topcoated separately and they’re basically never coming off again. We’ll see.
I haven’t finished the Grand Slam sword yet, and we’ll see what happens there. Once I had painted the handle, I realized that the chrome plated blade just looked ridiculous next to the painted parts, so I want to strip the chrome, but so far I haven’t had any success. I’m not a fan of this thing anyway, so at least if I end up destroying it in the attempt, I can’t say I’ll really care too much. Painting up the blade could be fun, though.
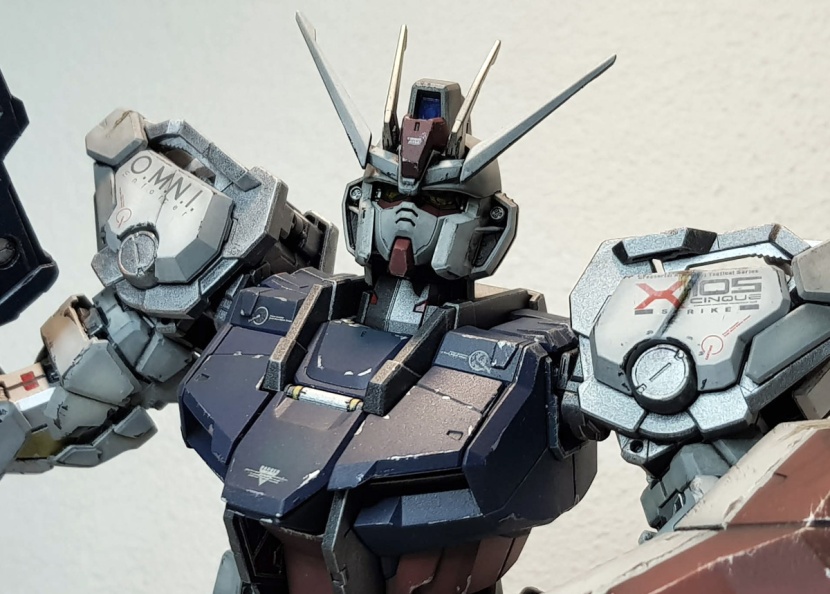
The last thing I’ve got so far is the head. Now I complained in the build review that the pre-molded eye piece with the clear and grey parts was dumb because it couldn’t be painted, but as it turns out, I was wrong. Here’s what I did.
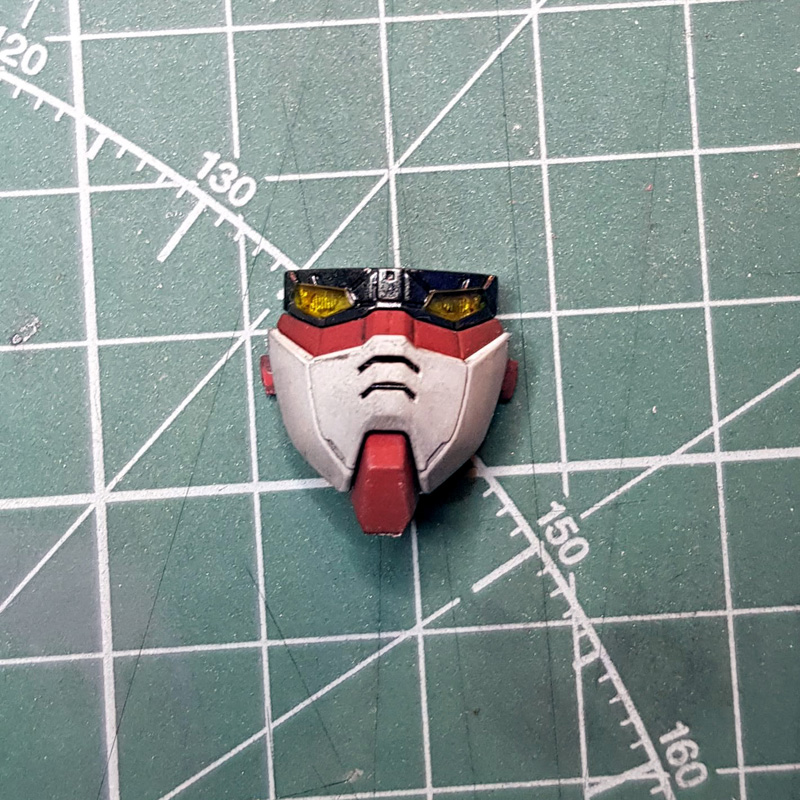
The clear parts are actually slightly raised – just a fraction of a millimeter, but enough for a small detail brush to bump up against them, so painting the area around it gun metal was a piece of cake. I also painted the whole thing gold leaf on the inside and clear yellow on the front for the clear parts, and boom, anime accurate shiny yellow eyes.
And yes, this means I won’t be able to use the LED anymore, but as I’ve said numerous times, I really think these head LEDs are pointless, especially the one on this kit because it just doesn’t work properly, and even when it does, it’s not nearly as bright as I’d like it to be. So I decided that if I was going to display this kit without the LED, I was going to paint it to look good without it, and I’m pretty happy with how it turned out.
Sadly, as per the rules of model kittening, for every small experiment that goes right, something simple that you’ve done a million times before goes wrong.
I wanted to paint the cameras silver on the inside and clear blue on the outside, and I just couldn’t for the life of me get a decent coat of blue on the big one. You can’t really see it anymore now that it’s inserted, but the paint pooled in the middle, and even after stripping and reapplying it did the same thing again, so I gave up. Sigh.
Otherwise, the head was a pretty straightforward affair. Since all the mechanical detail gets covered up, I just drybrushed it chrome silver over the gun metal and left well enough alone.
And that’s it for this WIP update. As I’m writing this, I’m getting started on the limbs, which will no doubt take a good bit longer than the torso what with how complicated the legs are. I kind of want to be done with the suit before the 21st because that’s when I’m going away for work until the end of the month, but we’ll see. I’ve been at it for months, so no point in rushing things now.
Not to mention I haven’t even primed the parts for the Aile Striker. Ideally I’d have that painted and gunk washed by the 21st so the oil paint can dry while I’m gone. And then there’s the base. I don’t even have a plan for that yet, all I know is I’m not leaving it unpainted.
Real Grade Aile Strike Gundam
Yeah, I know, where the hell have I been. Like I said last month, I have actually been building lots of things, I just really haven’t had time to take pictures. Winter means it’s usually dark when I’m home and since I rely on daylight for my photoshoots, it’s been hard to find time to snap good photos of my build. I may have to get a photo booth or just live with night pictures for the next few months.
Anyway, while I was waiting for the Skygrasper to go with my PG Strike, I decided I’d build this kit to tide me over. I was also in the middle of painting an MG Banshee Norn, but since I was kind of going through a slump with that one, I figured maybe actually finishing a kit would, I dunno, help me regain my Gunpla mojo.
Also, Real Grades are like crack, and I can’t stop buying them.

The RG comes with the Aile Striker unit, obviously, unlike its PG ancestor, but the parts count still isn’t that crazy. It’s only the 3rd kit in the RG line and still relatively simple.
Note also the small sticker sheet. There’s an obnoxious amount of foil stickers, but only 74 regular markings, not counting multiples. Certainly far less than for the RX 78-2 and the Zaku that immediately preceded this kit.
Partially motivated by this, I decided to try something new and panel line this one. I never did this on Real Grades before – many of them look cluttered as it is, especially once you get the stickers on, and I always thought it was weird to have so many “real” panel lines because of all the parts separation on the armor and combine that with panel lines that are painted on. With hindsight, I’m glad I did it, and at least the Freedom probably could’ve used it too.
The way I decided to go about this was, I panel lined everything on the sprues with liquid ink Gundam markers – black for the blue and the dark red parts, grey for everything else. This seemed by far the fastest way to get the job done, and when you’re using these markers on bare plastic, it’s actually best to let them dry for a while anyway. For some reason, when they’re dry, they wipe off the surfaces more easily than when they’re still wet, and they stick to the panel lines like glue. So I just did basically a pin wash on everything first, then cut the parts loose and wiped off the excess during assembly. By the time I got around to each individual part, it had had enough time to dry to make cleanup really easy.
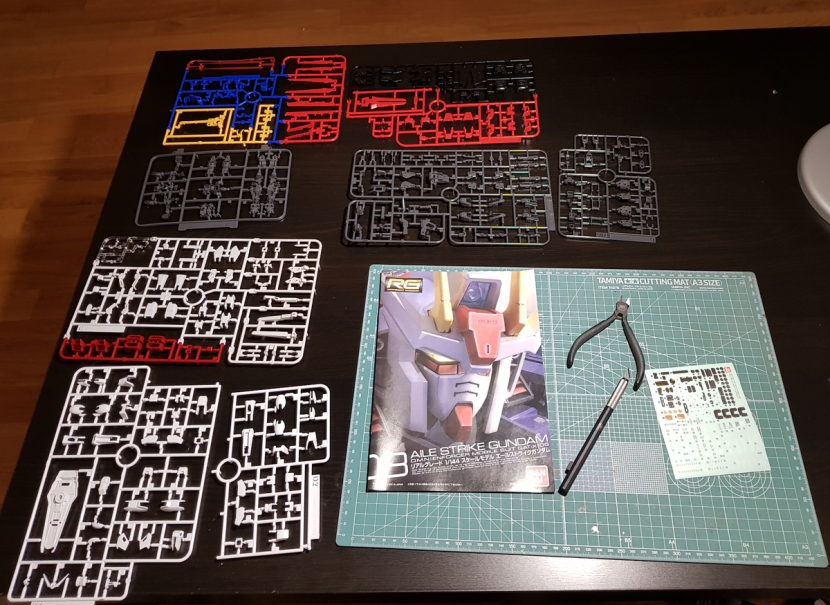
Once I’d cut all the parts off the sprues, I ended up with this.
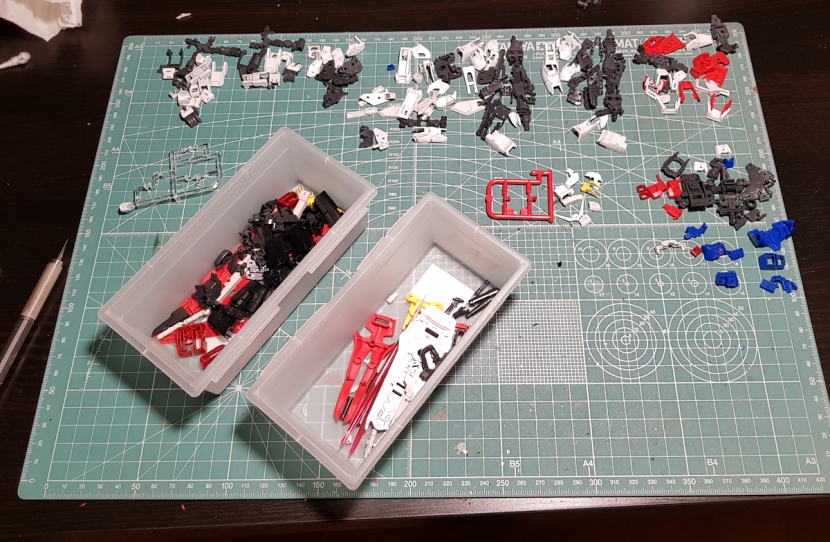
The trays contain the parts for the Aile Striker and the weapons, the rest is sorted by the steps in the instructions. It took about four hours to get here, and those four hours weren’t particularly enjoyable, but then again, they were followed by 90 minutes of uninterrupted assembly, so that part was really fun, and I’ll probably build all my RGs like this from now on.
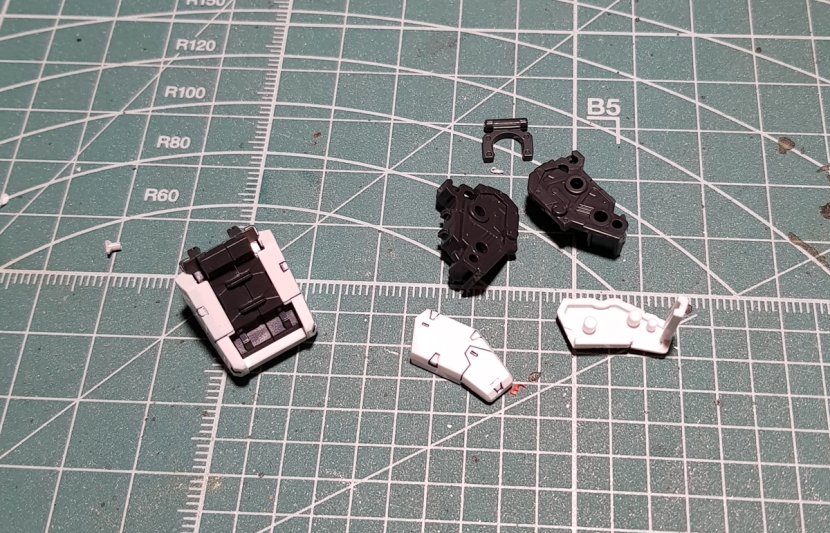
Now stop me if you’ve heard this one before, but the build starts with the feet.


As you can see, they look nice (note the color separation on the soles) and consist of quite a few parts. As usual, though, articulation becomes virtually nonexistent once you get the armor on. Y’know, it’s an RG, so… yeah. That’s what happens.
The legs are one of my favorite things about any version of the Strike, so I was really looking forward to the next step, and it didn’t disappoint.


There’s not as much going on here as on the PG – the way the knee armor moves is far more simple, and the side pistons aren’t connected to the ankles. But the legs still look really, really nice with all the parts separation and the inner frame showing through the gaps. Right about here I also realized that panel lining this kit was a good idea as there’s tons of small detail on every armor part that pops nicely once it’s lined and adds to the mechanical feel of the legs.
The skirts are also relatively involved – each of them consists of two parts, and the side skirts have three because of the opening hatch for the Armor *snicker* Schneiders.


And I swear, you guys, this was the first build I documented with my new phone, and it did that thing where only the feet are in focus again. Both phones are Samsung. Do Koreans have a foot fetish? Sigh.
The shoulders are a disappointment, I’m afraid.
It’s ok that they’re this simple because they don’t really have to do anything, but they just look blocky and ugly. In fairness, there’s another part for each of them, but they don’t tell you to do this until you plug the arms into the torso – it’s the contraption on top that folds out where the add-on parts attach that come with the Skygrasper.
The arms aren’t all that hot either. Of course this is kind of inherent to the design of the Strike, but to me they look like a bunch of dice stacked on top of each other. That straight line down the front really is a bit much.


Also, the closed fists on the B sprue are the usual cat’s paw hands that nobody in their right mind would want to use, and since there aren’t any other options, you’re stuck with the articulated hands. And no, I won’t stop saying that those are ugly. Because they’re ugly.
The torso’s next, and I’m happy to report that it’s very detailed and much less frustrating to build than the PG’s torso.


I also still think the Aile Strike looks like a Camaro that thinks it’s a robot that transforms into a plane. Just, y’know, for the record.
Other than the opening cockpit hatch revealing the usual empty pilot seat, the torso doesn’t do anything, but it doesn’t need to – it’s just where you plug in the Aile Striker, after all.
The head is next, and, well, what can I say – it’s a Real Grade head, so you know what to expect.


Everything’s molded in the correct colors, and the detail is great. Like on the Freedom, though, the camera piece is inexplicably molded in clear plastic instead of the blue shown on the box, so you’ll have to paint it if you want accuracy. I skipped that this time because I’m still miffed about how dark it came out looking on the Freedom.
I also have to say that looking at the kit in real life, I don’t really think the head’s too big. That’s a common complaint about this one, and looking at pictures I always kind of agreed, but now that I’m looking at it on my shelf, it’s really fine.
Anyway, since I have the PG sans Skygrasper, of course the Aile Striker was the main attraction for me. It was getting late at this point, but no way was I going to stop without getting to see the suit with the wings on.


Speaking of the wings, for a pair of what’s basically straight airplane wings, they do consist of a lot of parts, which of course means they look really nice.
Up next are the boosters, which are also very detailed. They also come with a bunch of foil stickers that go behind those red grills, if you’re into that sort of thing. I didn’t use them.


And once the boosters are done, you plug it all together and your Aile Striker pack is done.
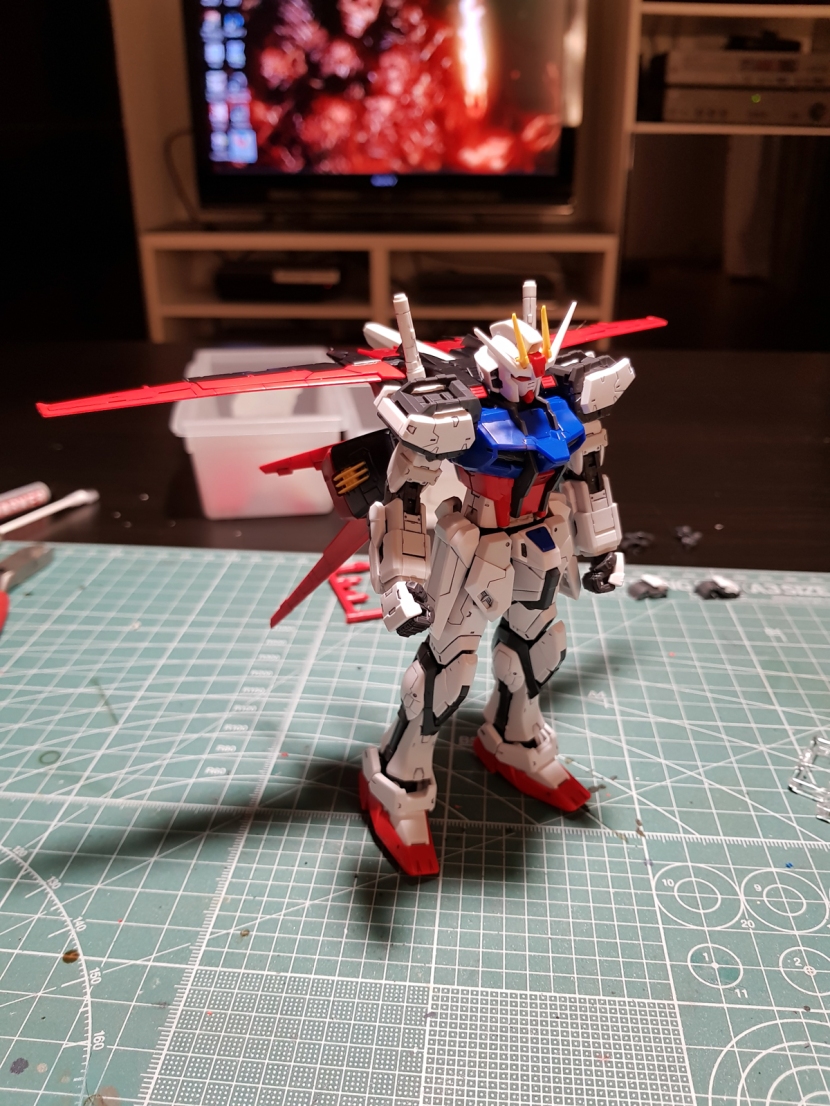
Now here’s the real shocker. You see that? No, not Gravelord Nito in the background. The kit is standing up straight. Only leaning forward a little. With that giant backpack on. I don’t know how that’s physically possible, but I saw ‘er with my own eyes, mister.
Now, accessories. The instructions actually tell you to build these before the Aile Striker, but I skipped ahead and then built the weapons the next day.
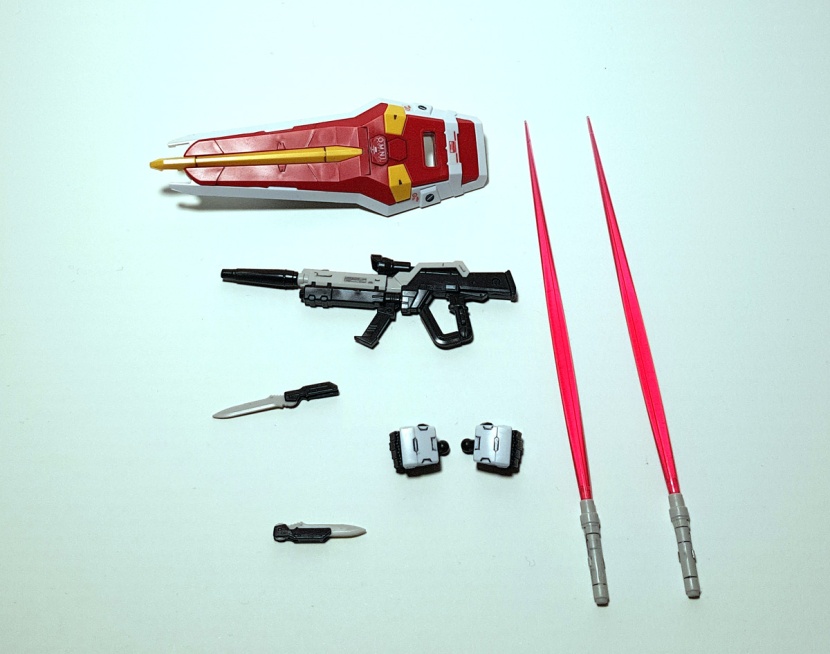
It’s not much – you get two beam saber effect parts, closed fist and articulated hands, the beam rifle, the Armor-Schneiders (no, I didn’t type that without giggling), the shield and the usual action base connector. It all looks very nice, but it’s not perfect.
The camera piece for the gun is also molded in clear plastic, and attaching said gun to the hand is a massive pain because the tab that folds out is so loose that you end up folding it back in instead of getting it into the palm about a dozen times before it works. There’s a trigger finger hand that comes with the Skygrasper set, but that doesn’t work either.
I also don’t like how the beam saber handles that go on the back are dummies and you have to store the real ones that actually go in the hands separately, especially because you only get two of the top pieces that the blade effect part plugs into, so you have to swap them out if you want to pose the kit with the sabers. Just seems like a totally unnecessary omission to me. And finally, while the Armor-Schneiders are actually better than their PG counterparts (they’re two separate pieces instead of the pre-molded stupidity on the PG), the hands can’t hold them for shit, which is why there are no pictures here with them.
Poseability is ok, but those side skirts do get in the way of a lot of leg movement, I’m afraid. Somehow, though, probably because of the backpack, almost every pose you do with this kit looks really cool.


As you can see, I did end up using a good number of those foil stickers for the wings, and for some unfathomable reason I actually quite like them. I don’t know what’s wrong with me.
Anyway, I’ll have another blog coming about the RG Strike someday – I also bought the Skygrasper with all the extra weapons, but there’s so much in there that it really does warrant a separate entry.
Meanwhile, do I recommend this kit? Absolutely. Other than the shitty hands, it’s very solid without sacrificing poseability – one of the least fragile RGs that I’ve built for sure. Of course if you’ve never liked the Strike or generally refuse to buy SEED kits, this one won’t change your mind, but I happen to be a fan of this particular design, and the RG is a very nice representation. In fact, I have a second one that I plan to detail paint and matte coat.
