
Real Grade Sazabi
After the massive undertaking that was the PG Aile Strike, I was kind of glad to get the RG Sazabi. To this day, I still just snapfit and panel line my Real Grades, and honestly, that’s kinda what I needed right now. Turns out, though, that I wasn’t going to do this one in one sitting like I usually do.
The RG Sazabi is far and away the biggest and most complex Real Grade ever made. I didn’t do the math, but I’m pretty sure the parts count is higher than even the Unicorn’s, and, well, it’s the Sazabi, so it’s gigantic. The box is quite literally the same size as most recent MGs like… incidentally, the MG Unicorn. Everything about this kit is big and crazy.
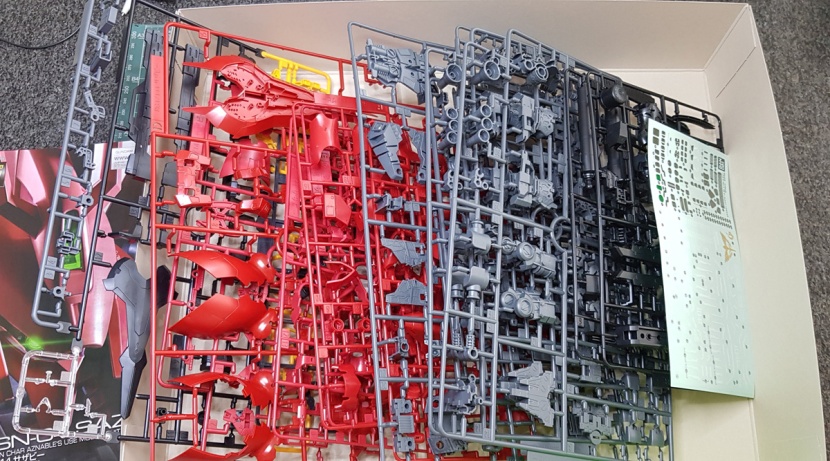
For example, this is usually the point in my review where I show you a picture of all the sprues laid out nice and neat on my table, but for this one, that was impossible. I had to pile them back into the box like this, sorted alphabetically like I would for a Master Grade. So this’ll have to do for my “here’s what’s in the box” pic this time.

Like on the Tallgeese, the B sprue is practically nonexistent. The part in the middle goes on top of the waist section to hold the skirts, the number 2 parts next to it are the elbows, and the ones on the outside are for the shoulder armor – that’s it. The rest of the joints is assembled like on any other Gunpla kit.
Honestly, I have zero issues with this. Some people might argue that with this being the second kit after the Tallgeese where most of the inner frame is assembled the old-fashioned way, the RGs are losing what distinguishes them from the other lines, but to me, their selling point was always being basically MG-level detail at 1/144th scale, and the pre-molded inner frame parts where just a means to an end.
Also, you might notice just from looking at this that there are sections separated by joints that don’t appear to have their own injection gates, but they actually do; it looks like the second layer of the sprue is removed before packaging as there are clearly visible gate marks on these parts.
Anyway, guess what? The build starts with the feet.


As you’d expect, you put together the inner frame for the foot and the ankle joint, then you plug the armor on top of it.
Next are the legs. Nothing too out of the ordinary here either.


Double jointed knee, a movable flap in the back that the thrusters at the ankle attach to, and that’s that. There’s no sliding armor here and no crazy exploding knee. I’m okay with the latter, but I guess it’s mildly disappointing that nothing at all moves as you bend the knee. Then again, the fact that the legs are as flexible and stable as they are, given the bulk and awkward weight distribution of the bellbottom armor, is amazing enough as it is – it doesn’t need any more gimmicks.
The waist section is next, and uh, yeah.
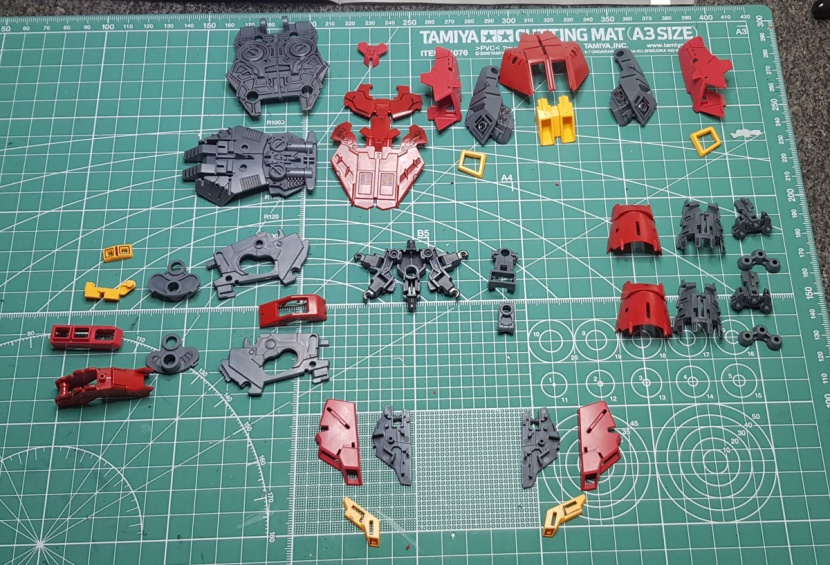
Of course, if you know anything about the Sazabi, you won’t be surprised to see that the waist and the skirts have the combined parts count of a small HG kit (also, as usual, there’s actually a few parts missing in this picture because I’m an idiot.) As you can see, though, that’s not just because of their bulk, but also because there’s a lot of nice inner detail and some opening hatch gimmicks here.


The main section consists of two halves with a swinging hip joint section in the middle, the aforementioned B sprue part that goes on top and is secured in the front and back with two parts that I didn’t photograph separately because cf “idiot” above, and then the armor goes on the outside.


The front skirts are next, consisting of three parts each and with a bunch of holes in the armor for the grey inner part to show and add some really nice color separation. Otherwise, nothing special here – no hatches open.


Next is the massive rear skirt section with opening hatches on the side and a ton of detail. At this point I was starting to think this kit would really be fun to paint and looking at these pictures as I’m writing this makes me ponder buying a second one to do just that.


The side skirts are simpler, but they do also have an opening hatch gimmick. And that completes the waist section.


Next is the upper torso, which is a nice example of economical design. As you can see, it looks fantastic and it’s jointed in two places for a decent ab crunch, but it doesn’t really consist of all that many parts. The tubing, especially, is just one chunk instead of a maddening pile of Zaku beads, but if I’m honest, I think with a little panel lining it looks just as good and it’s more solid.
Also, there’s been a lot of horror stories about the shoulder joints, but I really didn’t have any trouble with them. You do have to make sure you press them all the way down for the armor to fit around them, but other than that, they’re fine.


Next are the arms. Like the legs, they’re reasonably complex and really pretty looking, but they don’t have shifting armor plates. There is a nice little piston detail for the elbow, though. As you can also see in the second to last picture, there is no actual beam saber handle stored in there, just a dummy that makes it look like there is one. Given that the tradeoff is better stability, I can’t say I have a problem with this.


")

The shoulders are the final section with a B sprue part in them. Internal detail on every armor piece, everything’s articulated to make room for the arms to move, and there’s an open hatch gimmick as well.
 And we have a headless Hessian. I also finally figured out how to get the camera to focus on the top instead of the feet. Sadly, this means the end of a beloved RoboShop tradition, and I’m sure I’ll lose all of my legions of followers over this.
Uh, anyway, here’s the head.


Now unfortunately, I can’t quite show you this to you properly. It’s assembled in sections, as you can see, and has the sphere for the cockpit with opening parts around it, but I ran into a bit of trouble here.
First of all, the t-shaped part for the mono-eye was broken out of the box; the mono-eye itself was almost snapped off. That wasn’t a problem Tamiya Extra Thin couldn’t fix, though. What happened next was that, as you can see here, I decided to try painting the mono-eye instead of using the sticker. As I kind of expected, that came out basically invisible behind the visor, so I decided to take the head apart again and put the sticker on. And at that point, the clear part for the visor broke, and I had to glue the entire head assembly together. It looks totally fine as the broken part is hidden behind armor, but of course it doesn’t open anymore, and I’m always handling it pretty gingerly.
I really think the problem behind both these issues is that the clear parts are unusually brittle, at least for Bandai’s standards. This isn’t usually a problem with their kits, but you’re going to want to handle these carefully.
Then you get to the backpack, and I demand that you look at this.


LOOK AT IT.
The good news is, though, that despite consisting of seven parts each and having the full range of gimmicks with the opening side panels and protruding barrel, the funnels are actually less fiddly to assemble than on the MG. The side panels are partially held in place by the grey section on the inside, not just the armor part that goes on top of them, so you don’t have to somehow try and hold all four of them in place as you’re squeezing the top armor section on to secure them in place.


And then the backpack goes together like so. As you can see, it has a nice opening hatch gimmick in the center section, and of course the binders open and close; there’s actually a section that you pull out to open them, but honestly, it doesn’t work that well, and you have to be kind of careful not to open them too far or they’ll explode.
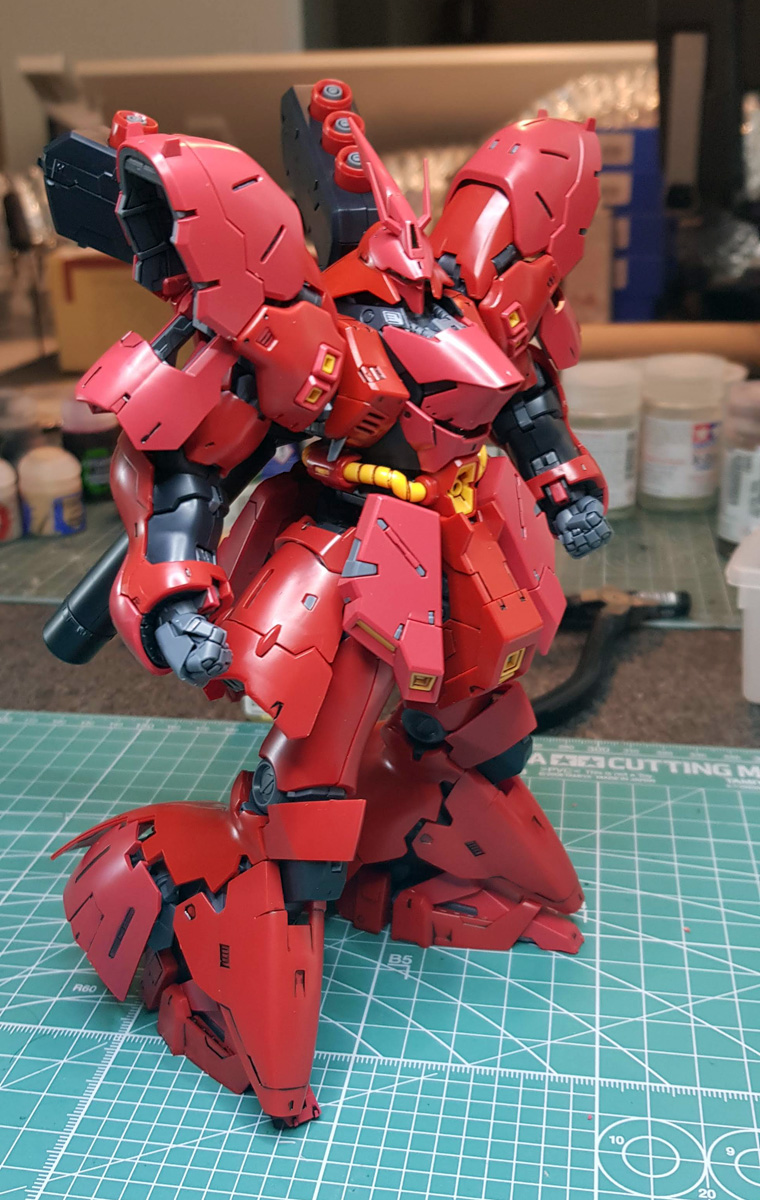
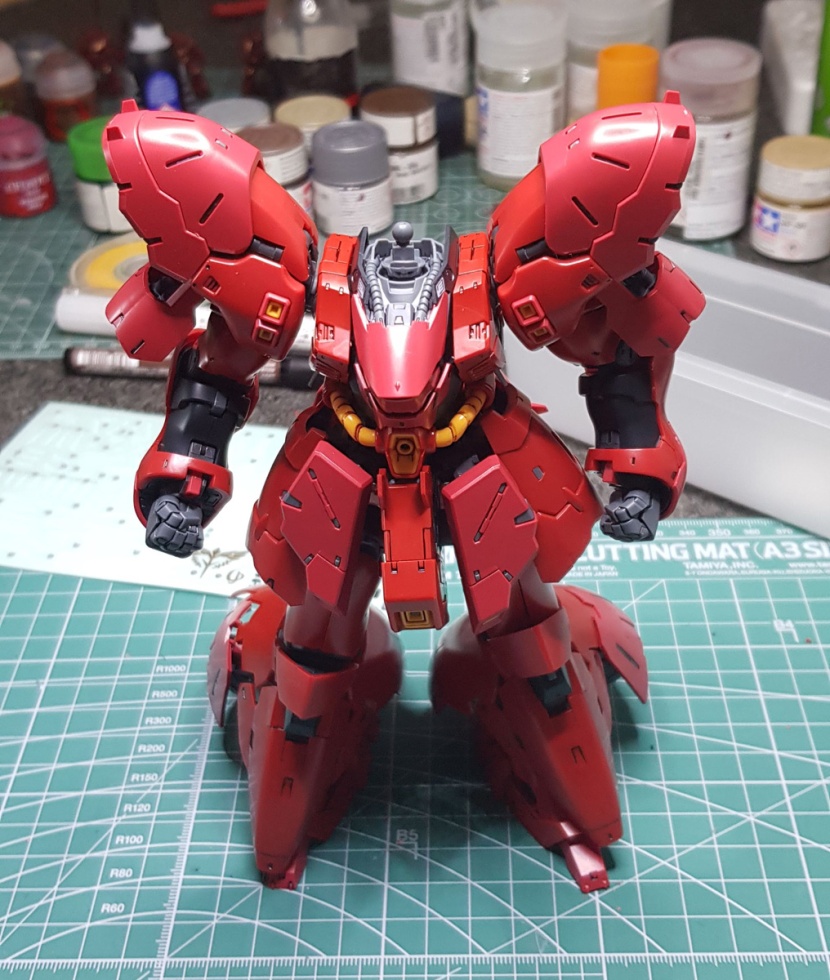
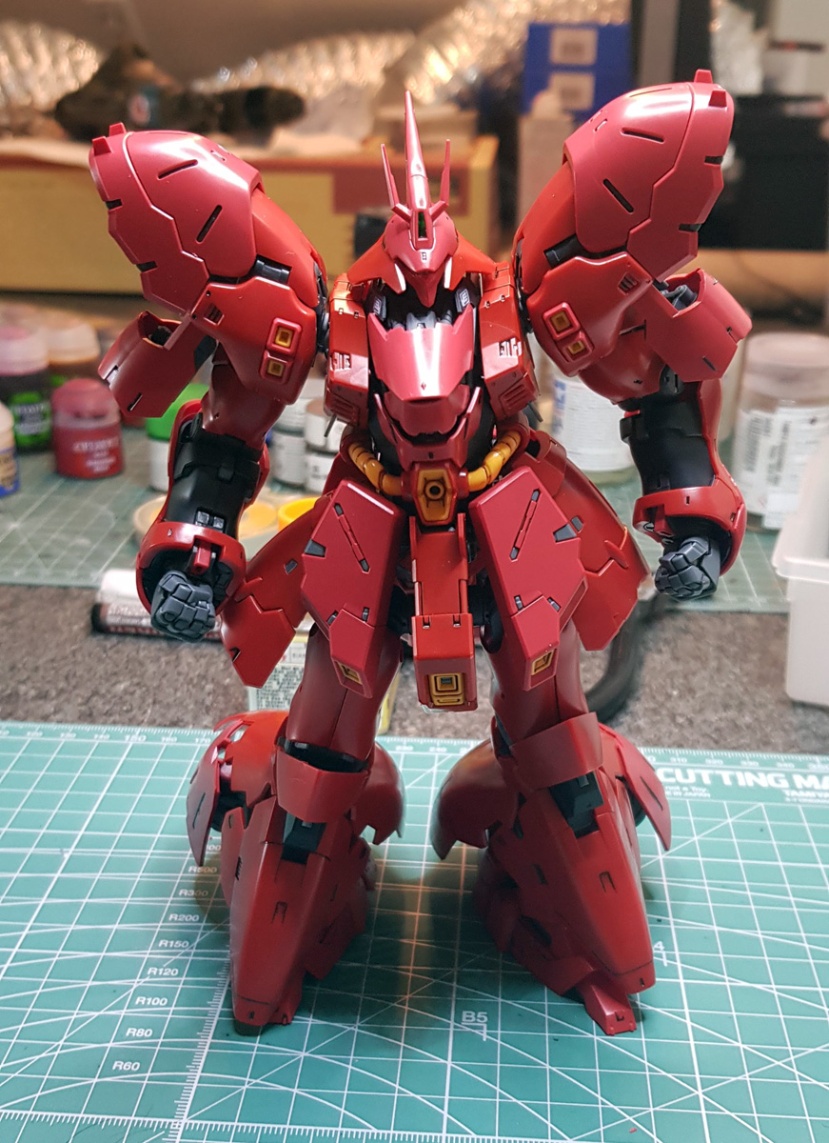
And we’re done. At this point I’d like to point out, purely because I think it’s what really stands out about this picture, that the RG Sazabi has by far the most accurately proportioned shoulder armor out of all the versions of this suit. For my tastes, this is an ongoing problem with every kit of the Sazabi – one of its most striking features in the anime is the bulk and curve of the shoulder armor, and they’ve never really gotten this right. This is definitely the closest any kit has come to accurately reproducing the proper proportions.
And that brings me to the accessories.
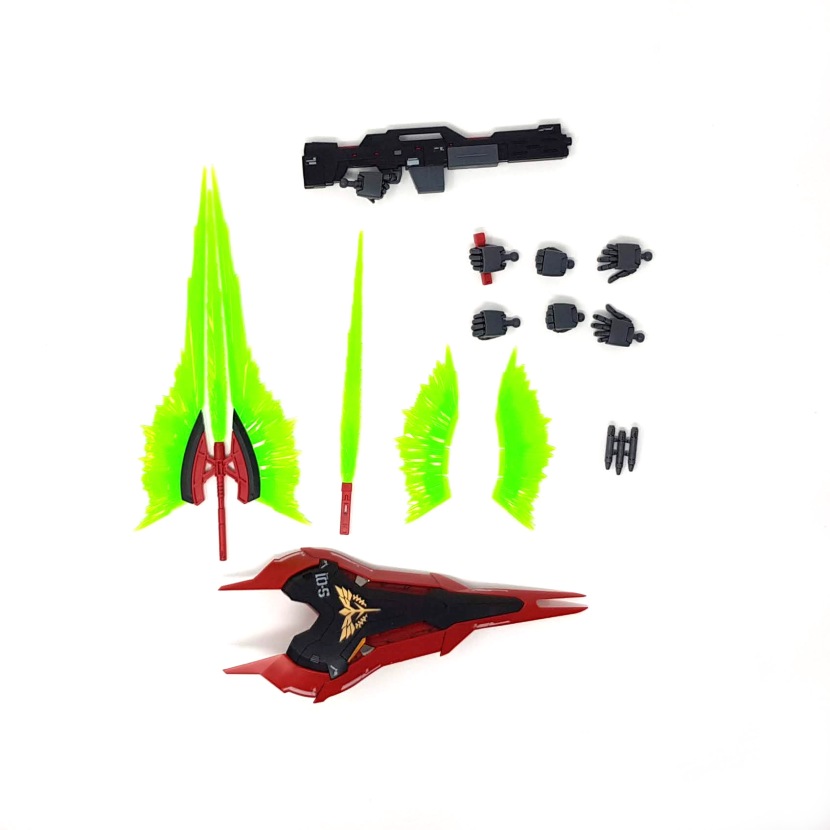
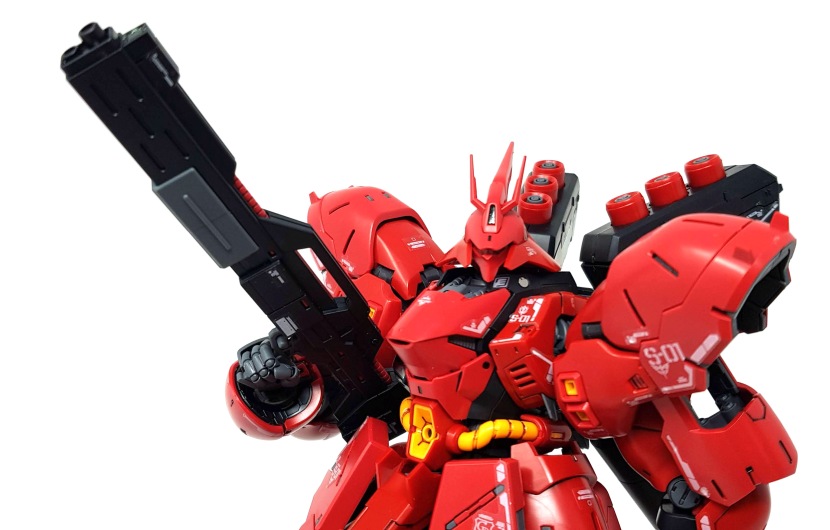
You get the shot rifle, the shield, two beam sabers with effect parts and the beam tomahawk with the long and short effect parts, as you’d expect. The beam tomahawk can also be mounted on the shield. Other than that, nothing attaches anywhere, but it all sure does look damned good. Also, you get a sufficient range of fixed-pose hands to hold everything, two fists and two open hands, and the holding hands have jointed wrists to help with posing. There’s also an action base adapter and a Char pilot figure that aren’t in this picture because I’m too cool to actually take useful pictures that contain all the necessary information.
If I have one complaint, it concerns the accessories, or more precisely the conspicuous absence of the long rifle. As you may know, this rifle is only available as a bonus item with a magazine, and if you’ll excuse my French for a second, that’s fucking bullshit. The long rifle is the gun that most fans of the Sazabi prefer, and to separate it from the main kit (which is expensive as hell for an RG) for a promotional stunt like this is just unforgivable.
Personally, I’ve always preferred the shot rifle, so I don’t need to play Bandai’s game here, but this is honestly the only thing they could’ve done that’s even worse than making the Sinanju‘s bazooka available exclusively as an overpriced P-Bandai add-on kit.
That’s about the only complaint I have, though. As mentioned above, this kit is missing the sliding armor gimmicks that have been a staple of RG design for as long as the line has existed, and I’m not entirely sure how I feel about the fact that that’s apparently a thing of the past, given that the Tallgeese also didn’t have it. I always liked it, but these two kits just seem to be considerably more sturdy because of the way their inner frames are put together, and if that’s the tradeoff, I think I can live with it. It’s not like they’ve otherwise scaled back the detail or complexity – this was the first time I had to split an RG build over several days, and at the same time, very little about it was fiddly or difficult, it’s just a lot of stuff.


And as you can see, poseability is excellent, given that this is the Sazabi. I can’t honestly say that I like this more than the MG Ver. Ka because it just doesn’t quite have that kit’s level of detail, but it does have the improved proportions and both the poseability and stability to allow you to display it in the kinds of dynamic poses you actually want out of a Sazabi.
In conclusion, I think we have a new best Real Grade kit. This thing just doesn’t have any flaws. With the Unicorn, I really think there’s an issue with the proportions, but this one actually has better proportions than its predecessors, if anything, and sacrifices absolutely nothing in terms of posing, stability, sturdiness, and general fun factor both during the build and posing it for this photoshoot. Absolutely fantastic kit – get one if you can, they’re selling like hot-cakes for a reason.
And by the way, I know the damned ammo clip is missing in every picture with the gun, but “I’m an idiot” is the theme for this review, in case you hadn’t noticed.
Sigh.
